| • | Based on those Access Rights granted in the Dealer User Maintenance Form, Additions and/or Modifications may be made by the Technician within this Central Station tab. |
| • | Once information is edited, the Technician must Click the Save < Icon. |
| • | Save - The Save < Icon allows the Technician to save any Additions and/or Modifications made to the data on this screen. |
| • | Cancel - The Cancel  allows the Technician to abandon any Additions and/or Modifications made to this form, prior to saving. allows the Technician to abandon any Additions and/or Modifications made to this form, prior to saving. |
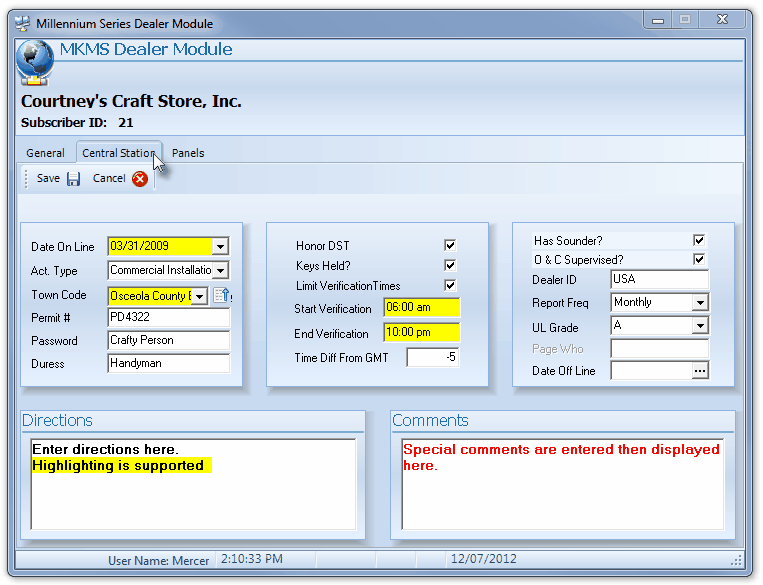
Central Station tab on the Millennium Series Dealer Module
| • | Modifying the data displayed on the Central Station tab: |
| • | Date On Line - Enter the Date this system went on line at your Central Station using the Drop-Down Date Selection Box provided. |
| • | Act. Type - Using the Drop-Down Selection List , Choose the appropriate Account Type for this Subscriber |
| • | Town Code - This represents the governmental body in which this Subscriber's premises exists and from whom Emergency Response Services are provided.. |
| ▪ | Using the Drop-Down Selection List , Choose the appropriate code to link the Police, Fire and Medical Emergency Response Telephone Numbers to the Account. |
| • | Permit # - If the Subscriber must have a Permit Number issued by the local authorities to have a Central Station alarm event accepted for Dispatch, enter that Permit number here. |
| • | Password - The word(s) or other expression spoken by a Subscriber to identify themselves verbally during a Telephone conversation with a Central Station Operator or any other Alarm Company Employee who may require it. |
| • | Duress - The word(s) or other expression spoken by a Subscriber to identify themselves verbally during a Telephone conversation with a Central Station Operator indicating that they are under Duress. |
| • | Honor DST - If the Subscriber's Time Zone Honors Daylight Savings Time, Check this box. |
| • | Keys Held - If you are in possession of the keys to this Subscriber's premises, Check this box. |
| • | Limit Verification Times - Normally, when an Alarm Event requires Verification, the Operator must Verify that signal whenever it is received. |
| ▪ | However, the Subscriber may Limit Verification Times to a specific period of the Day if desired. |
| ▪ | To do so, Check this box. |
| ▪ | Enter the Start Verification and End Verification times in the fields provided. |
| ▪ | Start Verification - Enter the Starting Time when the Verification procedure to occur. |
| ▪ | End Verification - Enter the Ending Time, the time when the Verification procedure should stop. |
| • | Time Difference from GMT - Enter the time difference - in number of hours - from your Subscriber's Standard Time to GMT Standard Time (usually a minus number). |
| ▪ | What is your Subscriber's Time Difference from GMT? - It is the number of Hours (+ or -) between their Standard Time and that of Greenwich Mean Time (GMT). Not sure? |
| ▪ | Assuming that they have their Computer's internal Clock set correctly, |
| o | They may Select (from the Windows® Desktop) Control Panel |
| o | Double-Click on the Date/Time . |
| o | Click the Time Zone tab on the Date/Time Properties form |
| o | Then have them note the Time Zone they've selected. |
| o | The Letters GMT and a number will be included in brackets in front of the selected Time Zone. |
| o | Enter this number in the Time Difference from GMT field including the minus sign (if present). |
| • | Has Sounder - If their alarm system has an audible device (e.g., Bell, Siren, Horn), Check this box. |
| • | O & C (Opening & Closing) Supervised - When defining Panel Zones and CSID Zones, some of these Zones are assigned an OCTAR Code of O for Opening or C for Closing. |
| ▪ | This does not necessarily mean that this Subscriber is to be Supervised. |
| ▪ | If you actually are required to Track and Supervise access to their Premises, Check this box. |
| ▪ | Be sure to define their Events. |
| • | Report Frequency - If this Subscriber has requested to receive a periodic report of their Opening and Closing (and perhaps other) Events, the frequency at which these reports are to be transmitted are indicated here (Daily, Weekly, Biweekly, Monthly). If no reporting is required, Select None. |
| • | Dealer ID - If you are providing this Subscriber's Central Station Monitoring services for another Alarm Dealer, their Dealer code will be displayed. |
| • | UL Grade - If their alarm system possesses a UL® Certificate, enter the UL® Grade of that certificate here using the Drop-Down Selection List . If no UL® Certificate has been issued, Select None. |
| • | Date Off Line - If this Subscriber has gone Off-Line (regardless of reason) Click the Ellipse button  and Confirm that you do want to take this Account Off Line. and Confirm that you do want to take this Account Off Line. |
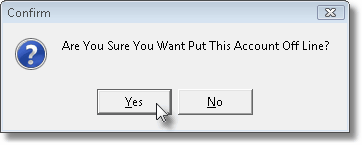
Confirm this action
| ▪ | Then, enter the Off-Line Date using the Drop-Down Date Selection Box provided. |
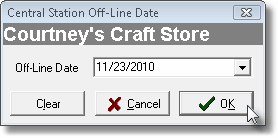
Central Station Off-Line Date
| ▪ | The Technician must Confirm that they agree with the terms of the Off-Line request. |

Verify dialog
| ▪ | Finally, after a final Confirmation, the Account will be taken Off-Line. |
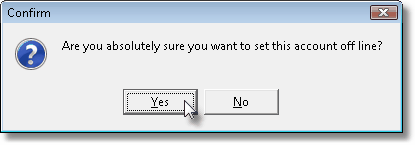
Re-Confirm this action
| • | Putting an Account (back) On Line when an Off-Line date has been defined: |
| a. | If a block of Accounts were created using the Create Mass Accounts feature, the Date Off Line may already be filled in. |
| b. | If the Account was previously taken Off Line, there will already be a date inserted in the Date Off Line field. |
| ▪ | If you need to do so, to (re-)activate monitoring for this Account, you must Click the Ellipse button and Confirm that you do want to activate the Account. |
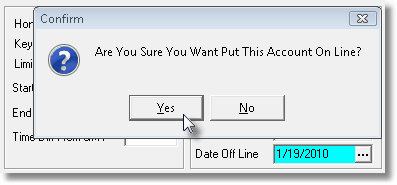
Confirm this action
| • | Directions - This is a free form Memo Pad (see Rich Text Editor) used specifically for entering the Directions to the Premises. |
| • | Comments - This is a free form Memo Pad (see Rich Text Editor) used specifically for this Subscriber 's Central Station related notes. |
| ▪ | Use it to maintain specific Monitoring related information not accommodated using the standard fields available on this and other Central Station Data forms. |
| • | Once you have updated the information on the Subscriber's basic Central Station tab, be sure to Click the Save < Icon. |

