| □ | Whether reviewing the Receipts for the Month, balance with a Deposit Slip for Making a Bank Deposit, or checking a specific Subscriber's payment history, you will need to print a Cash Receipts Report. |
| • | From the Main Menu Select the Reports Menu then Choose the Accounts Receivable sub-menu and Click Cash Receipts. |
| □ | Cash Receipts Report tabs - There are two tabs on the Cash Receipts Report dialog. |
| • | Options - Initially only the Options tab is shown (until you make your Options selections and Select Print). |
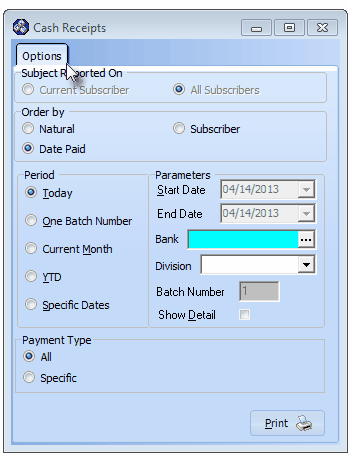
Cash Receipts Report All Subscribers default Options
| • | Subject Reported On - Choose whether to report on the Current Subscriber, or All Subscribers. |
| • | If you have selected the Cash Receipts Report from the Reports Menu with no Subscribers Form open, the default selections will be as shown above, and All Subscribers will be your only option.. |
| • | If this report was selected with a Subscribers Form on screen, the default selections will be as shown below. In this case, Current Subscriber is selected but you may alternately select All Subscribers, if needed. |
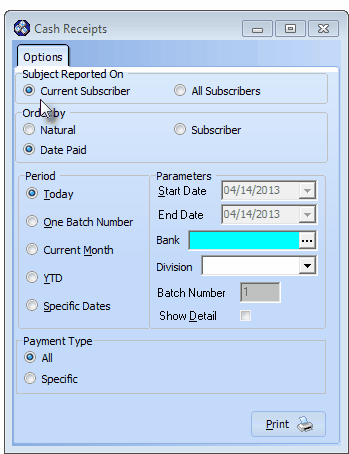
Cash Receipts Report - Current Subscriber default Options
| • | Order By - The system may list the selected Receipts in the Natural Order they were entered, or by Date Order based on the Date selected on the Receipts Posting or Receipts Form, when the Receipt was recorded - which may be different then the actual day the entries were made.. |
| • | Period - Choose what Receipts will be listed based on when they were dated when recorded. |
| • | Today - List Receipts posted in the current day. That date will be inserted in the Start Date and End Date fields and cannot be changed. |
| • | One Batch Number - Because you may have used multiple Batch Numbers in the same day, or the same Batch Number on multiple Days, you may list Receipts based on a specific batch Number. |
| ▪ | Batch Numbers may be assigned from 1 to 32637 (this limitation is a function of the field type into which you are entering this Batch Number). |
| o | You may start a new numbering sequence each month (using the current Date's Day number), so the same Batch Number will be used in multiple Months but the date will be different. |
| o | In some cases, you may use the same Batch Number for more than one day to group certain of these types of payments together. |
| o | You may use multiple Batch Numbers within the same day to separate Credit Card transactions from Cash Receipts, and to separate those Receipts from EFT funds. |
| o | You may start from 1 and increment the Batch Number perpetually (if you used 2 batch numbers for two deposits every day, 5 days a week, it would take over 60 years to use all of the numbers). |
| o | The down side of the second method is that you must keep track of the next number to be used. |
| o | Each month starts a new sequence so the same Batch Number will be used in multiple Months |
| ▪ | MKMS automatically records Receipts in an individual Month & Year group to keep them differentiated. |
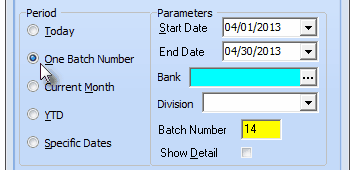
Cash Receipts Report dialog for One Batch Number
| ▪ | In some cases, you may use the same Batch Number for more than one day to group certain of these types of payments together. |
| ▪ | Batch Numbers may be assigned from 1 to 999. |
| ▪ | Each month starts a new sequence so the same Batch Number will be used in multiple Months |
| • | Current Month - Lists all Receipts for the current Month (or selected month using the Specific Dates selection explained below). |
| ▪ | MKMS automatically records Receipts in an individual Month & Year group to keep them differentiated from Receipts in other Months that will have used the same Batch Number.. |
| ▪ | In the illustration above you will see that the Month of May and the Year of 2009 are automatically assigned based on the batch Number and Dates entered. |
| ▪ | YTD - (Year to Date) - Lists all Receipts for the current Year. You may report for a different year using the Specific Dates option below. |
| • | Specific Dates - List Receipts posted within a selected time period by using the Specific Dates selection. |
| ▪ | Enter the Start Date and End Date in the Parameters section, as needed. |
| ▪ | Any date range may be used including multiple year reporting. |
| • | Parameters - Used to further customize what is to be included in this report. |
| • | Start Date / End Date - Used to define Specific Dates when that Period Option is checked. |
| • | Bank - By default, [All] the Receipts posted to All Banks using the selected Batch Number will be included. |
| i. | You may limit Receipts to those posted to a specific set of (one or more) Bank(s). |
| ii. | Click the Ellipse in the Bank field to open the Select Bank ID dialog. |
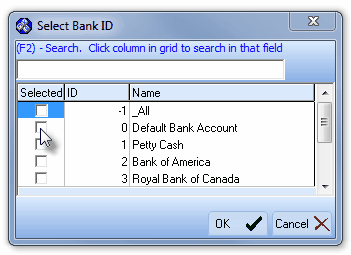
Select Bank ID dialog
| iii. | Check the Selected box for each Bank that is to be reported. |
| iv. | Click the OK ü button to Close the Select Bank ID dialog. |
| v. | This will insert the Selected Bank IDs into the Bank field. |
| • | Division - Select a Division using the Drop-Down Selection List provided. |
| ▪ | Report Receipts only from a specific Division |
| ▪ | Reporting by Division is particularly useful for tracking Dealer Billing Receipts and separate Intra-Company profit centers. |
| ▪ | The Division field selection is optional. |
| • | Batch Number - Enter when the One Batch Number Option is selected |
| ▪ | You must enter the Batch Number to be reported. |
| ▪ | Be careful when entering the Start and End Dates because the selected Batch Number usually will also have been used in many other months. |
| • | Show Detail - Include the detail of each amount that was Allocated to which Invoices, and the total amount of the Receipt that was allocated. |
| • | Payment Type - Used to specify which Payment Type(s) will be included on this Cash Receipts Report. |
| • | All - By default All Payment Types will be reported. |
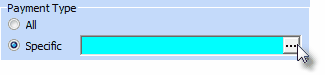
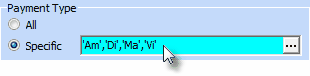
| • | Specific - To limit the Cash Receipts Report to Receipts paid using specific Payment Type(s): |
| ▪ | Click the Specific button and then Click the Ellipse (as shown above). |
| ▪ | The Select Pay Method dialog will be displayed. |
| ▪ | Check the Selected box for each Payment Type that is to be included on the Cash Receipts Report. |
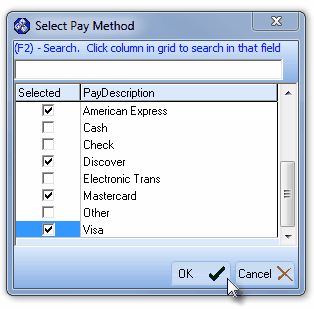
| ▪ | Click the OK ü button to insert this information into the Specific field. |
| • | Print - Click the Print button to Preview or Print (to a File or a Printer) this report. |
| • | The report may be viewed before printing to assure yourself that you have made the correct selections. |
| □ | Preview - The Preview tab presents the report which resulted from the Options you've selected. |

Cash Receipts Report - Preview
| • | Arrows - The arrows allow you to move back and forth, from page to page. |
| • | Number - Indicates the page number you are viewing. |
| • | Fit To Page - Click the first button after the arrows to size a full page of the report to fit the screen. |
| • | Zoom To 100% - Click the second button after the arrows to display the page at 100% (of the printed view). |
| • | Fit To Page Width - Click the third button after the arrows to size the page of the report to fit the full width of the screen. |
| • | Zoom To Percentage - Click the fourth button after the arrows to re-size the page of the report by percentage. |
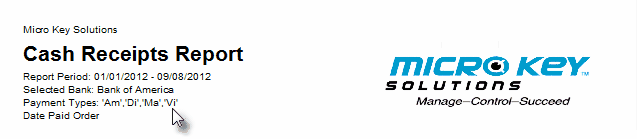
Cash Receipts Report - Preview - Header showing report based on specified Payment Types
| • | Print - Click the Print button to Print (to a File or a Printer)  the displayed Cash Receipts Report. the displayed Cash Receipts Report. |
| • | Exit the form by Clicking the Close button x on the right at the top of the form. |

