| □ | Who has Requested Service, had a Work Order created, but has not yet had that requested repair/inspection/installation completed? |
| • | Things happen, it gets busy, so you need an easy way to see the big picture - and get the answer to this question whenever you need it. |
| • | The Open Service Requests report provides a clear, comprehensive and selective method to view all of your pending Service Requests. |
| • | To print an Open Service Requests report, from the Main Menu Select Reports, Choose the Service Tracking sub-menu, then Click on Open Service Requests. |
| □ | Open Service Requests tabs - There are three tabs on the Open Service Requests dialog. |
| • | Options - Initially only the Options tab is shown until you make your Options selections (see the "Making the Selections" section below) and Select Print. |
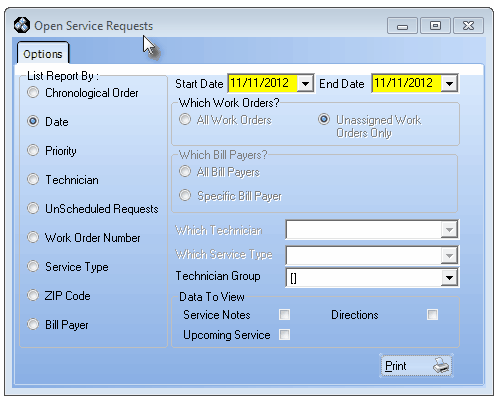
Open Service Requests Report - Options tab
| □ | Making the Selections - To specify the contents of the Open Service Requests report: |
| • | Start Date / End Date - By default, it will be Tomorrow. |
| • | Use the Drop-Down Date Selection Box es to re-set these Starting and Ending Dates (when permitted), as needed. |
| ◆ | In all "List Report By" cases explained below, Work Orders that have been assigned a Service On Date, but have not been marked as Complete, will be included in this report if the specified selection conditions are met. |
| • | Chronological Order - Lists all Scheduled Work Orders in Date Order, from oldest to newest, then within each of these Dates, by the Time Scheduled, from oldest to newest. |
| ▪ | Dates may not be specified as all Scheduled Work Orders will be listed. |
| ▪ | You cannot specify Which Technician nor Which Service Type will be included (see below), they will all be included. |
| • | Date - By default, the List By selection will be Schedule Date, and that default Date will be Tomorrow - the actual date you are requesting this report - (see Start Date / End Date below). |
| ▪ | It is assumed that most of the time you will produce this report to see what needs to be dealt with Tomorrow. |
| ▪ | If necessary, you may change either of the dates offered. |
| ▪ | Work Orders will be listed by Schedule Date, and within that Date, by the Scheduled Time of the Work Order. |
| ▪ | You cannot specify Which Technician nor Which Service Type will be included (see below), they will all be included. |
| • | Priority - Click Priority to list the Open Service Requests in their assigned Priority Level Order. |
| o | The Priority Level may be changed, as appropriate, in the Service Requests Form. |
| o | You may also choose Which Work Orders? are to be included (see "Which Work Orders?" below) on the Open Service Requests report. |
| o | This list of Work Orders will be printed in Priority Order, and within each Priority level, by Work Order Number. |
| o | You cannot specify Which Technician nor Which Service Type will be included (see below), because they will all be included. |
| ▪ | Which Work Orders? - When the Priority option is selected, the Which Work Orders? section is activated. |
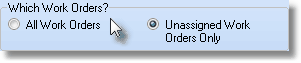
| o | All Work Orders - When this choice is available and it is Selected, All Open Service Requests will be listed, whether scheduled, unscheduled, assigned or unassigned. |
| o | Unassigned Work - When Date is the List By selection, it will be Unassigned Work Orders based on the assumption that you want to see what needs to be scheduled, and therefore assigned to a Technician Tomorrow. |
| • | Technician - You may Choose to list the Open Service Requests in Technician order, then by Schedule Date. |
| ▪ | The listed Open Service Requests will have been Scheduled and therefore assigned to a Technician. |
| ▪ | Which Technician - Which Technician automatically selects [All]. |
| o | Using to Drop-Down Selection List provided, the Technician List By option will allow you to Choose a specific Technician. |
| o | You may use that Drop-Down Selection List to Choose to list Schedules Work Orders for one specific Technician, if needed. |
| ▪ | The Start and End Dates - by default are set for Tomorrow - but may be reset as needed, also. |
| ▪ | You cannot specify Which Service Type will be included (see below), they will all be included. |
| • | Un-Scheduled Requests - Click this option to see all Open Service Requests that have not been scheduled. |
| ▪ | You cannot specify Which Technician nor Which Service Type (see below) will be included, they will all be included. |
| • | Work Order Number - All Open Service Requests - whether scheduled or not, will be listed by Work Order number, from oldest to newest. |
| ▪ | You cannot specify Which Technician nor Which Service Type will be included (see below), they will all be included. |
| • | Service Type - By default, Which Service Type will be set for [All] so all Service Types will be included. |
| ▪ | You may use that Drop-Down Selection List to Choose one specific Service Type, if needed. |
| ▪ | You cannot specify Which Technician (see below) will be included, they will all be included. |
| ▪ | The listed Open Service Requests will have been assigned a Schedule Date and therefore also assigned to a Technician. |
| • | ZIP Code - This Open Service Requests report is ordered by Schedule Date, then within each Schedule Date, by ZIP Code. |
| ▪ | The default Dates will be Tomorrow - the actual date you are requesting for this report may be reset- (see Start Date / End Date below). |
| ▪ | You cannot specify Which Technician nor Which Service Type will be included (see below), they will all be included. |
| • | Bill Payer - This Open Service Requests report may be limited to the Subscribers with Open Service Requests that have had a separate Bill Payer defined for them. |
| ▪ | Click the Bill Payer option to filter the report based on Open Service Requests for Subscribers with a separate Bill Payer defined for them. |
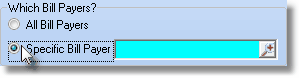
| ▪ | Which Bill Payers? - When the Bill Payer option is chosen, the Which Bill Payers? section is activated. |
| o | All Bill Payers - Subscribers with one or more Open Service Requests, who also have been assigned a Bill Payer address, will be included in the report. |
| o | Specific Bill Payer - Only a Selected Subscriber, with one or more Open Service Requests, who has a separate Bill Payer address, will be included in the report. |
| ◆ | Search - If Specific Bill Payer was chosen, Click the Search Icon to open the Select Bill Payers dialog. |
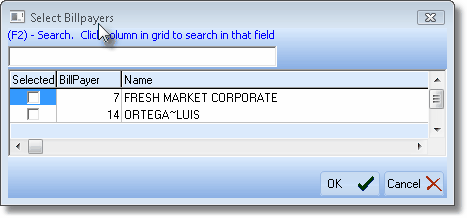
Select Bill payers dialog
| o | Check the Bill Payer(s) to be included in the report. |
| o | Click OK to complete the selection. |
| o | Only Subscribers, which have a specific Bill Payer address defined, will be included in this Open Service Requests report. |
| o | If several Service Locations - each billed to the same Bill Payer address - have Open Service Requests, those Accounts will all be grouped together on this report |
| o | Each selected Bill Payer will be listed (in alphabetical order), followed by each of their Service Locations (one at a time), and the Open Service Requests for that Service Location (listed beneath that Service Location Address); then the next Billing Address is listed, its first Service Location, that Service Locations Open Service Requests, the next Service Location, etc. |
| • | Which Service Type - Some of the List By choices will allow you to select a specific Service Type using to Drop-Down Selection List provided. |
| • | About the Use of Technician Groups: |
| ▪ | Employees (who are Technicians) may be assigned as Members of one or more Technician Groups (sometimes also referred to a Service Groups), based on their Skills, Location, Language, Company Division - or any combination of these. |
| • | Data To View: Regardless of what List By method you have chosen, you may specify that certain additional information be included on the report, as needed. |
| • | Service Notes - To include a brief description of the protection provided, Check this box. |
| • | Directions - To include Directions, Check this box.. |
| ▪ | Any color or text formatting using the Edit Rich Text feature will be included |
| • | Upcoming Service - To include any Recurring Service Item(s) defined in Auto Service that are due in upcoming months. |
| ▪ | The servicing Technician may also be able to perform the upcoming service(s) when completing the listed Open Service Request. |
| • | Print - Click the Print button  to Preview and optionally Print (to a File or a Printer) this Open Service Requests report. to Preview and optionally Print (to a File or a Printer) this Open Service Requests report. |
| □ | Preview - The Preview tab presents the report which resulted from the Options you've selected. |
| ▪ | Up Arrow/Down Arrow - hi - Moves the report one line up, or one line line down, respectively. |
| ▪ | Page Up/Page Down - Moves the report to the previous or next page, respectively. |

Open Service Request - Preview tab
| • | Home -  - Using either the screen or your Keyboard's Home key, moves the report to the top of the first page. - Using either the screen or your Keyboard's Home key, moves the report to the top of the first page. |
| • | End -  - Using either the screen or your Keyboard's End key, moves the report to the bottom of the last page. - Using either the screen or your Keyboard's End key, moves the report to the bottom of the last page. |
| • | Arrows - The arrows allow you to move back and forth, from page to page. |
| • | Number - Indicates the page number you are viewing. |
| • | You may also type in a specific page number, Press 8 Enter and that page will be displayed immediately. |
| • | If you enter an invalid page number, it will be ignored. |
| • | Fit To Page - Click the first button after the arrows to size a full page of the report to fit the screen. |
| • | Zoom To 100% - Click the second button after the arrows to display the page at 100% (of the printed view). |
| • | Fit To Page Width - Click the third button after the arrows to size the page of the report to fit the full width of the screen. |
| • | Zoom To Percentage - Click the fourth button after the arrows to re-size the page of the report by percentage. |

| • | When you Click the Zoom To Percentage button, the Percentage selector will be displayed. |
| • | You may then Click the Up or Down ‚ arrow to set the exact amount of Zoom you want. |
| • | Print - Click the Print button to Print (to a File or a Printer)  the displayed Open Service Requests. the displayed Open Service Requests. |
| • | Email - Click the Email button to open Outlook® and email this report to an address you specify. |
| □ | Data View - This view provides a tabular (spreadsheet style) presentation of the selected data. |
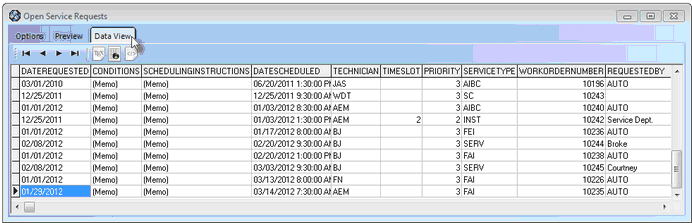
Open Service Request - Data View tab
| • | Arrows - Click the arrows to move through the record. |
| • | Export - Exporting the data from this Data View Form (note the "fly-over" help available on these buttons): |
| • | Export to CSV - Click the first button after the arrows to export the data to a Comma Separated Values (CSV) file format. |
| • | Export To Excel - Click the second button after the arrows to export the data to an Excel (.xls) file format. |
| • | Export To Html - Click the third button after the arrows to export the data to an HTML formatted file. |
| • | Exit the Form by Clicking the Close button x on the right at the top of the Form. |

