| □ | Sending Subscriber Statements to all those Subscribers who have a balance due - regardless of whether it is past due - is an integral part of the Collections process. |
| • | Subscribers should receive a Statement every month if they have any outstanding Invoices, whether or not they are Past Due. |
| • | Using the Subscriber Statements dialog, selected sets of Subscriber Statements may be sent in batches, based on their Account's status. |
| • | Each batch of Statements may have its own message tailored to that group of Accounts' status. |
| • | To print your monthly Subscriber Statements, from the Main Menu choose Reports and select the Accounts Receivable sub-menu where you Click Subscriber Statements. |
| □ | Subscriber Statements tabs - There are two tabs on the Subscriber Statements dialog. |
| • | Options - Initially only the Options tab is shown (until you make your Options selections and Select Print). |
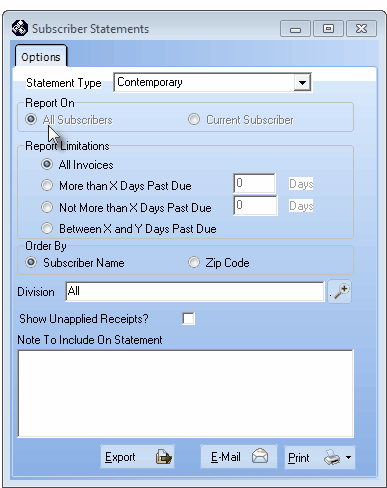
Subscriber Statements - Default dialog
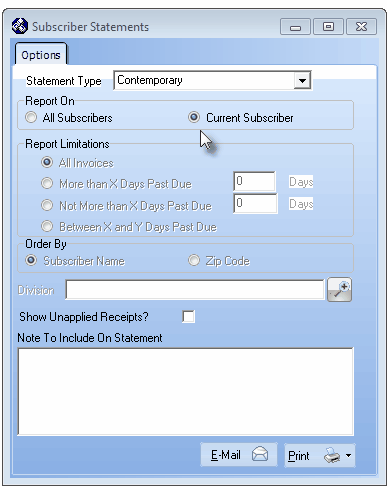
| • | Statement Type - Using the Drop-Down Selection List provided, Choose the Statement Type to use when these Statements are printed. |
| ▪ | Legacy - This is the original Legacy Subscriber Statement format shown below: |
Subscriber Statement - Legacy format with Statement Generated Date shown
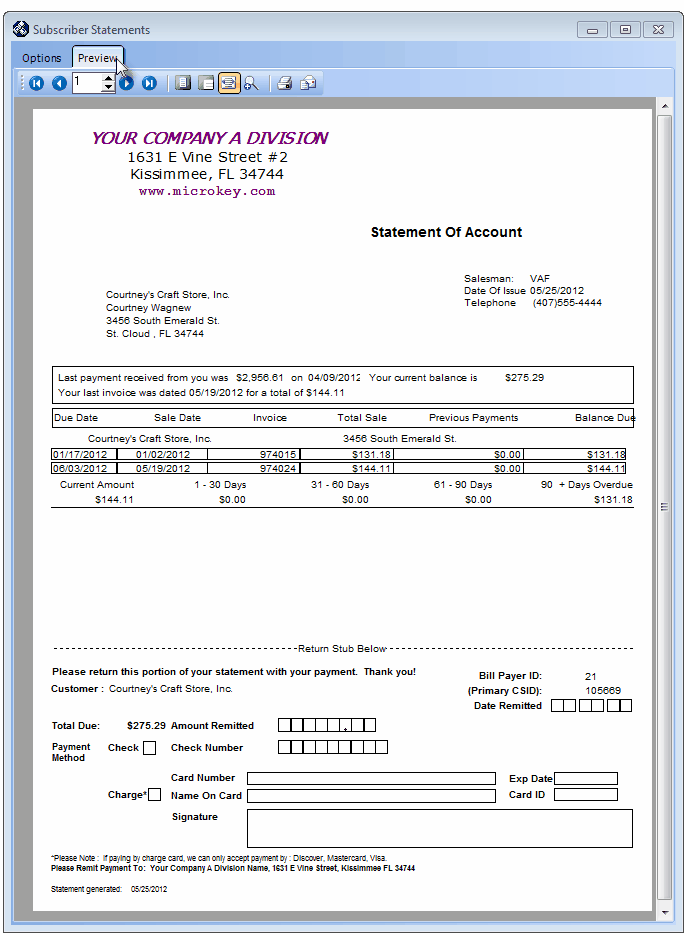
| ▪ | Contemporary - The revised Contemporary Subscriber Statement format is shown below (the Remittance stub is identical on both formats): |
Subscriber Statement - Contemporary format
| ► | Note: Once selected, the Statement Type Chosen becomes the default for that User until that User changes it again. |
All Statement Types include the Statement Generated: Date at the bottom of each page and on the Return Stub.
| • | Report On - By default, All Subscribers will be chosen. |
| ▪ | When Subscriber Statements is Selected from the Reports menu's Accounts Receivable sub-menu, this option cannot be changed. |
| ▪ | See "Printing One Statement" below for instructions on how to print a Statement for only one Subscriber. |
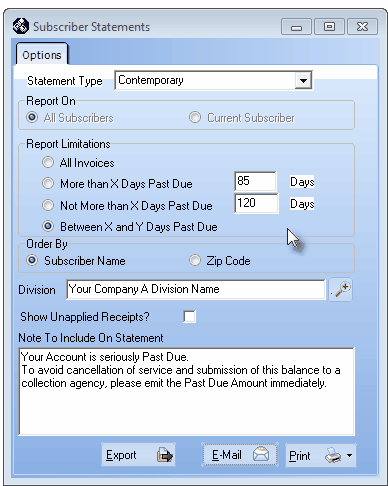
| • | Report Limitations - Specify what Subscriber Statements will be produced. |
| ▪ | All Invoices - Selected by default, any Subscriber with a Balance Due will be included. |
| • | Limiting the Selection of who will receive a Subscriber Statement. |
Subscriber Statements - Options tab with Report Limitations
| ▪ | More than X Days Past Due - Click this button to print Subscriber Statements only for Accounts that are past due beyond a specific number of days. |
| o | Enter the number of Days Past Due. |
| ▪ | Not More than X Days Past Due - Click this button to print Subscriber Statements only for Accounts that are past due less than a specific number of days. |
| o | Enter the number of Days Past Due. |
| ▪ | Between X and Y Days Past Due - Click this button to print Subscriber Statements only for Accounts that are past due a specific number of days but less than another number of days. |
| o | Enter the number of the Days Past Due "from and to". |
| • | Order By - Choose the order in which they will be Printed. |
| ▪ | Subscriber Name - Print in Alphabetical Order. |
| ▪ | Zip Code - Print in Zip Code Order. |
| • | Division - By default, All Divisions will be included. |
| • | Use the Drop-Down Selection List to Choose a specific Division (particularly useful when you are providing Dealer Billing). |
| • | Show Unapplied Receipts? - Check this box to include the Total Amount of Receipts that have not been applied to outstanding Invoices. |
| • | Note To Include On Statement - Always include a Note. |
| ▪ | This is where you may customize the message for the selected group of Subscriber Statements, based on the selected days Past Due and even their Company Division (or Alarm Dealer). |
| ▪ | Using the Collections process outlined in that chapter, you can incrementally intensify the message based on how long the Account are Past Due. |
| □ | Printing, Emailing, or Exporting the designated Subscriber Statements: |
| • | Print - Click the Print button to Preview or Print (to a File or a Printer) these Subscriber Statements. |
| • | These Subscriber Statements will be previewed before printing to Confirm your selections. |
| ► | Note: See the Custom Report Formats chapter if you want to learn how to modify the format of Subscriber Statements. |
| • | Email - Click the Email button to Email the selected Subscriber Statements to the Email Address on record for each of these Subscribers. |
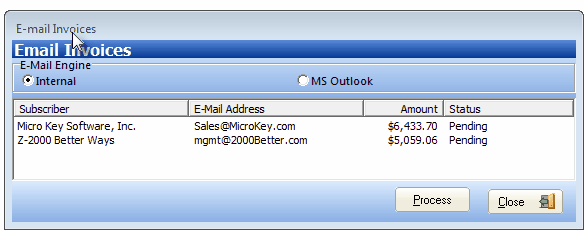
| • | E-Mail Engine - Click the appropriate button to indicate the E-Mail Engine that is to be used. |
| ▪ | Review the list of Subscribers who will be sent these Subscriber Statements. |
| ◆ | Only those Subscribers with an Email Address entered in the Contact Information section on the Subscribers Form will be included in this list |
| • | Process - Click the Process button to send the Emails. |
| ▪ | As each Email is sent, the Pending Status will be updated. |
| • | Click the Close button to leave this dialog. |
| • | Export - Click the Export button to create a text file containing the Subscriber Statements data which may be used by a Third-Party Billing & Printing Service Provider (such as DataBill™). |
| • | Clicking the Export button will open a Windows® "Save As" dialog. |
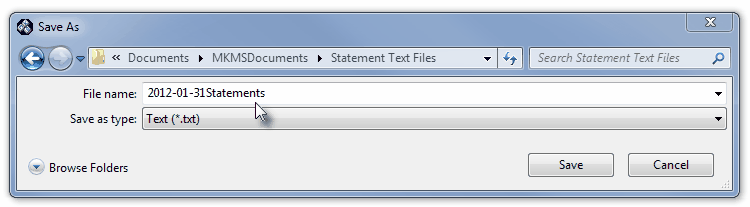
| • | Enter the filename which will become the text file containing the Statements data. |
| • | Click the Save button to start the Export procedure. |

| • | Once completed, an Information message will be displayed. |
| • | Two text files will be created: |
| 1. | Def.txt - a file format definition. |
| 2. | filename.txt - the actual Statement Data that was exported. |
| ► | Note: If your Company mails a high number of Subscriber Statements, DataBill™ (or similar services) may save money and time by providing a more efficient statement processing, electronic billing and bill printing solution which can improve your cash flow by eliminating the need for dedicated staff and equipment for these functions. |
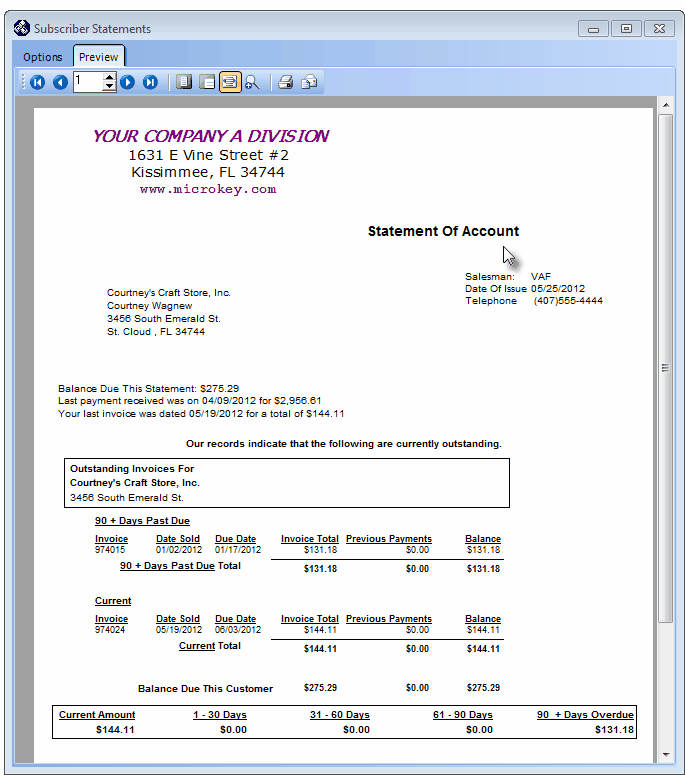
| □ | Preview - The Preview tab presents the Subscriber Statements which resulted from the Options designated above. |
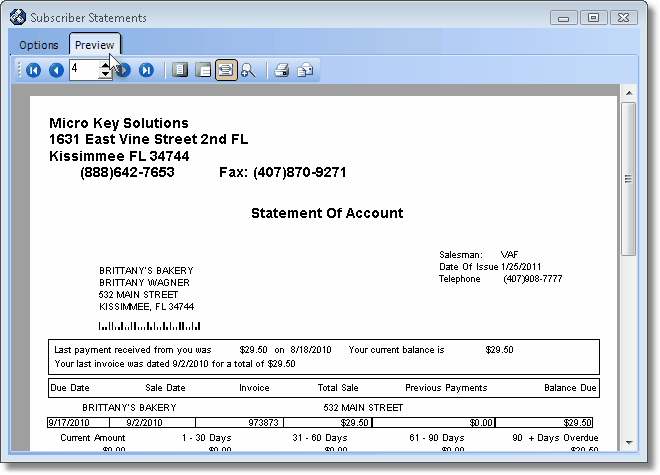
Subscriber Statements - Preview tab
| • | Arrows - The arrows allow you to move back and forth, from page to page. |
| • | Number - Indicates the page number you are viewing. |
| • | Fit To Page - Click the first button after the arrows to size a full page of the report to fit the screen. |
| • | Zoom To 100% - Click the second button after the arrows to display the page at 100% (of the printed view). |
| • | Fit To Page Width - Click the third button after the arrows to size the page of the report to fit the full width of the screen. |
| • | Zoom To Percentage - Click the fourth button after the arrows to re-size the page of the report by percentage. |
| • | Print - Click the Print button to Print (to a File or a Printer)  the displayed Subscriber Statements. the displayed Subscriber Statements. |
| • | Email - Click the Email button  to send the Subscriber Statements to an Email Address of your choosing. to send the Subscriber Statements to an Email Address of your choosing. |
| • | Exit the form by Clicking the Close button x on the right at the top of the form. |
| • | Choose Accounts Receivable and Select Subscriber Statement. |
| • | Options tab - Only one entry is required, the Note to be included with the Statement. |
| • | Statement Type - Using the Drop-Down Selection List provided, Choose the Statement Type to use when these Statements are printed. |
| ▪ | Legacy - This is the original Legacy Subscriber Statement format. |
| ▪ | Contemporary - The revised Contemporary Subscriber Statement format |
| • | Report On - The Current Subscriber option will be the one currently displayed on the Subscribers Form. |
Subscriber Statements - Options tab - Current Subscriber
| • | Report Limitations - None are available, All Invoices will be included. |
| • | Division - None required. |
| • | Show Unapplied Receipts? - Check this box to include the Total Amount of Receipts that have not been applied to outstanding Invoices. |
| • | Note to Include On Statement - This is where you can customize the message referring to the reason this Statement is being individually sent. |
| • | Print - Click the Print button to Preview this Subscriber Statement. |
| • | Preview tab - The selected Subscriber's Statement of Account will be displayed. |
| • | Print - Click the Print button to Print (to a File or a Printer) the displayed Subscriber Statement. |
| • | Email - Click the Email button to send this Subscriber Statement to an Email Address of your choosing. |
| • | Exit the form by Clicking the Close button x on the right at the top of the form. |

