| □ | The Calls dialog allows you to enter the time, date, comments and results of an Account related Telephone Call - both Incoming and Outgoing. |
| ► | Note: You must define Call Sources before you can use this Calls feature. |
| • | Click the Calls at the top of the Subscriber Form to open the Calls Form |

| • | The Calls Form is also available on the: |
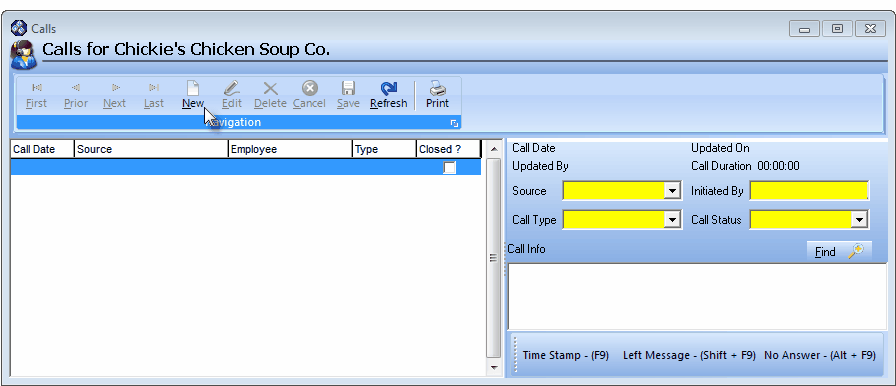
Calls Form - Default format with no entries
| □ | Understanding the Calls Form: |
| • | Navigation Menu - The Navigation Menu is located at the top of the Calls Form. |

| • | This Navigation Menu provides the normal Record Movement, New, Edit, Delete, Cancel, Save, and Refresh options; as well as special Print function. |
| • | The Calls Form consists of two main sections: |
| 1. | Call History List - Lists each previously entered Call record (shown on the left side of the Form). |
| 2. | Call Entry Detail - Provides the fields to define the caller (Initiated By), purpose (Source), Call Type and current status (Call Status), calculate the time required (Call Duration) and enter notes (Call Info) relating to the Call. |
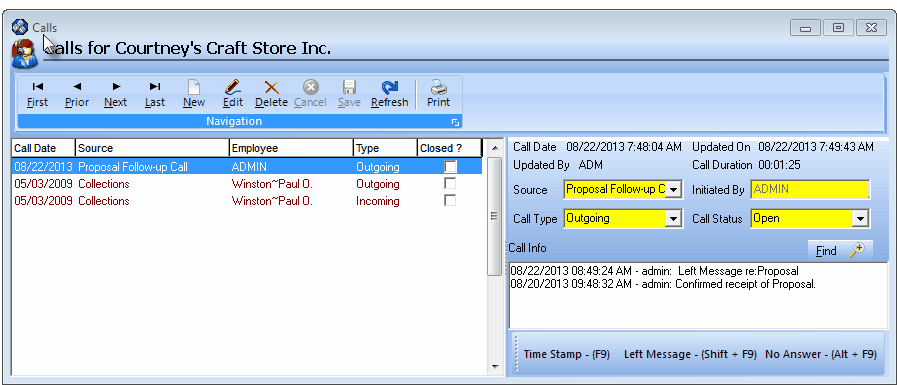
Calls Form - Showing Calls line items and a Call entry
| • | Sorting the Call History List - Click any Header Name within the Calls History List section to Sort the Call History in that order. |

Call History List may be sorted by any Header (column) Name
| • | By default, the data is listed in descending Call Date order. |
| • | Once a re-ordering selection is made: |
| ▪ | The Sort Order Icon (see mouse pointer in the illustration above) will be displayed in the Column selected (the one determining the order in which all the data will be listed). |
| ▪ | The Arrow indicates whether the data displayed is listed in ascending or descending order. |
| □ | Calls should be documented - in real-time - using the Calls Form. |
| • | On the Subscriber Information Form, Click the Calls at the top of the Form to open the Calls dialog containing the Calls information for the selected Subscriber. |
| • | On the Vendor Information Form, Click the Calls at the top of the Form to open the Calls dialog containing the Calls information for the selected Vendor. |
| • | On the Prospect Information Form, Click the Calls at the top of the Form to open the Calls dialog containing the Calls information for the selected Prospect. |
| • | Click Add ("+") - or Press Ctrl+I - to insert new Call information. |
| • | A new blank line will be created on the Calls information table of the left. |
| • | The Call Date is inserted at the top of the Call Entry Detail section, the Call Duration timer starts, and the Calls Information area will be cleared. |
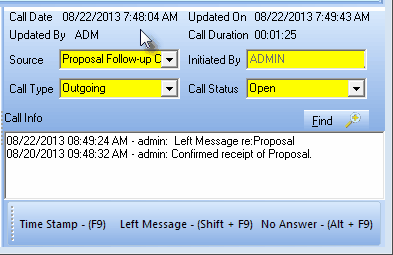
Calls Information entries
| • | Source - Select a Call Source using its Drop-Down Selection List . |
| ▪ | Examples of a Call's Source are: |
| a) | Collections - Call made to further a Collections effort. |
| b) | Customer Service Call - Call made to enhance Customer Service. |
| c) | Proposal Follow-up Call - Call made to forward the Sales Process. |
| d) | Sales Call - Call made to close a Sale. |
| e) | Service Call - Call made to Create or Confirm a Service Call. |
| f) | Service Follow-up Call - Call made to Confirm the Quality of the Service that was performed. |
| • | Initiated By - The current User's Name is inserted. |
| • | Call Type - Select the type of this call using its Drop-Down Selection List - either Incoming or Outgoing. |
| • | Call Status - Use the Drop-Down Selection List to Choose the status of this call ticket (Open or Closed). |
| ▪ | By default, the Status is set to Open. |
| ▪ | If Closed is selected, when the Call record is saved (Press Ctrl+S), the Closed? box in the Call History List line item for this entry will be Checked automatically. |
| • | Call Info - Enter Call related information, characterize the conversion, document the results, etc., that will clarify the purpose and/or result of this communication. |
| ▪ | Use the available Special Function Keys (see "Other Tools available on the Calls Form" below) to speed repetitive entries. |
| • | Click Save ("ü") or Press Ctrl+S to record this information |
| □ | Other Tools available on the Calls Form: |
| • | Special Function Keys are used to quickly enter commonly needed information. |
| • | Time Stamp (F9) - Press F9 to enter a Date & Time Stamp followed by the User's Login Name. |
| ▪ | This Call Info entry may be updated repeatedly until the call is finally Closed. |
| ▪ | When you do an Update, Select the appropriate Call detail line and Press F9 to time stamp the starting time of the continuation of the call history dialog. |
| ▪ | The Call Duration clock will add this additional time to the record. |
| ▪ | Make any additional Call Info entries as appropriate. |
| ▪ | Click Save ("ü") or Press Ctrl+S to record this additional information and stop the Call Duration clock. |
| • | Left Message (Shift+F9) - Press Shift+9 to enter a Date & Time + "Left Message" message. |
| • | No Answer (Alt+F9) - Press Alt+F9 to enter a Date & Time + "No Answer" message. |
| • | Each User may vertically expand the Calls Form, as desired. |
| • | The reset size setting will become that User's default position and size. |
| • | Find - To effectively review the Call Info dialog before making a follow-up contact with a Subscriber, Vendor, or Prospect, and because these dialogs may be quite long: |
| • | Select the desired record by Clicking on it in the Calls History Display, and then: |

| • | Click the Find in the Call Entry Detail section to locate a word or phrase within the Call Info field for a Selected Calls record. |
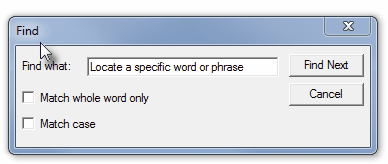
The Find dialog
| • | Find What - Enter the word or phrase that you are looking for. |
| • | Match whole word only - Check this box to require that the word or phrase that you entered must match completely. |
| • | Match case - Check this box to require that your search is case sensitive and a match will only be acceptable if the case of the entry matches it also. |
| • | Find Next - Click this button to start (or continue) the search. |
| • | Cancel - Click this button to end the search and close the Find dialog. |

