| □ | The Calls Report offers several ways to select which Calls data is to be included. |
| • | The Calls Report provides a detailed listing of the information that may then be filtered in multiple ways to be able to customize which Calls are actually included. |
| • | To print the Calls Report, from the Main menu Select Reports and then Choose the Calls option. |
| □ | Calls Report tabs - There are three tabs on the Calls Report dialog. |
| • | Options - Initially only the Options tab is shown (until you Choose your Options and Select Print). |
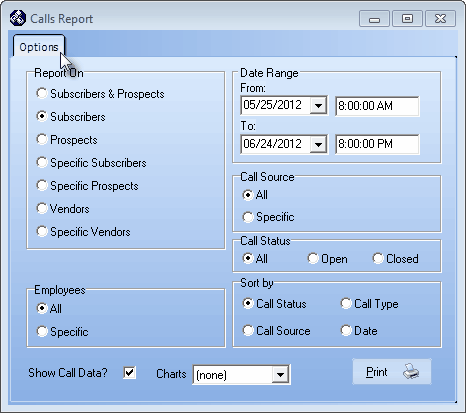
Calls Report - Options tab
| • | Report On - Click on the appropriate button to select which Call Entries are to be included in this report: |
| ▪ | Subscribers - Just Call Entries for Subscribers are to be included. |
| ▪ | Prospects - Just Call Entries for Prospects are to be included. |
| ▪ | Specific Subscribers - Only Call Entries to or from one or more specified Subscribers are to be included. |
| o | Specific - The Subscriber(s) field will be displayed. |
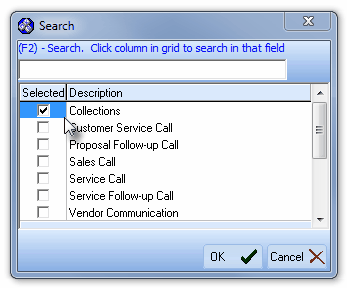
| o | Click the Ellipse  to Open the Search dialog shown below. to Open the Search dialog shown below. |
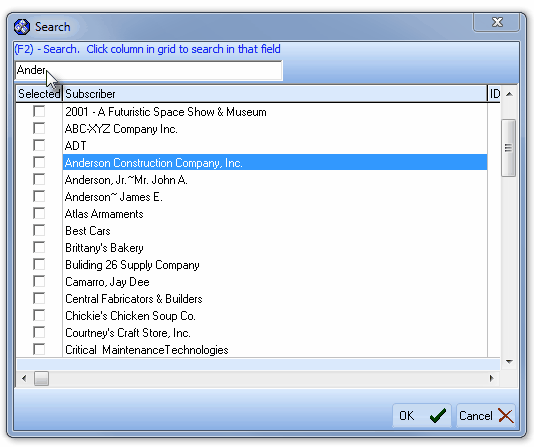
Calls Report - Subscriber Search dialog
| o | Check as many Subscriber records as needed to identify whose Call Entries are to be included in the report. |
| ▪ | Using the Search dialog: |
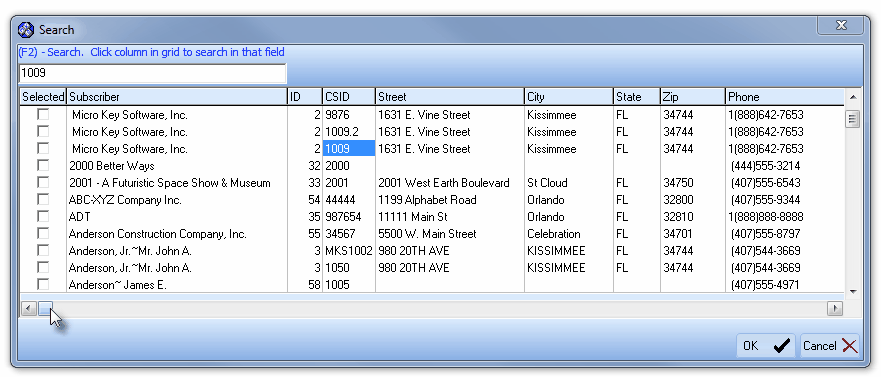
| o | Because of the potentially long list of Subscriber records that will be presented, you can locate a specific Subscriber record(s) as follows: |
Subscriber Search dialog
| i. | Expand the width of the Search dialog by Dragging the right border to the right. |

| ii. | Using the Slide Bar at the bottom of the Search dialog (see the mouse pointer the in illustration above) to view all of the available data Header Names, locate the Header Name on which the Search should be performed |
| iii. | Click on the Field in the first record line of that selected Header Name Column to Select the Header Name to search by. |
| iv. | Press F2 to position the cursor (and clear any previous entries) in the(F2)-Search field. |
| v. | Enter characters for the search. which will then be compared to the data in the selected Column. |
| vi. | As characters are entered, an incremental search is performed on the data within that Column. |
| vii. | Check the desired record(s) when the desired record(s) are located. |
| o | Repeat this process until you have located, and Checked each Subscriber that is to be reported. |
| o | Click the OK Pbutton to Close the Search dialog |
| o | As shown in the illustration below, the selected record ID's will be inserted into the Subscribers Selected field. |

| ▪ | If no selection is made, an error message will be displayed: |
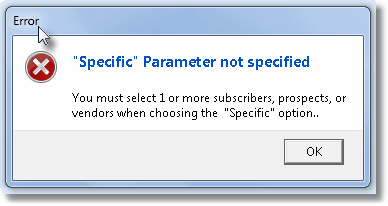
| o | Click OK and then make the required Subscriber selection(s) as described above.. |
| ▪ | Specific Prospects - Only Call Entries to or from one or more specified Prospects are to be included. |
| o | Specific - The Prospect(s) field will be displayed. |
| o | Click the Ellipse to Open the Search dialog shown below. |
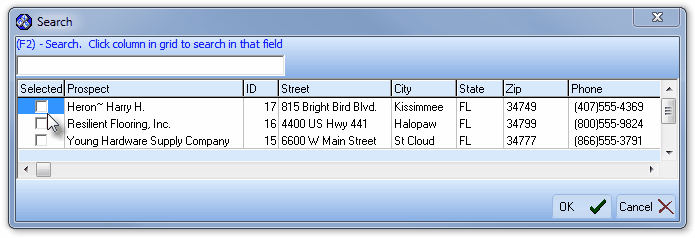
Prospect Selection dialog
| o | Check each Prospect whose Call Entries are to be included in the report. |
| o | Use the method outlined above in "Using the Search dialog" to make your Prospect selection(s) |
| ▪ | Vendors - Just Call Entries for Vendors are to be included. |
| ▪ | Specific Vendors - Only Call Entries to or from one or more specified Vendors are to be included. |
| o | Specific - The Vendor(s) field will be displayed. |
| o | Click the Ellipse to Open the Search dialog shown below. |
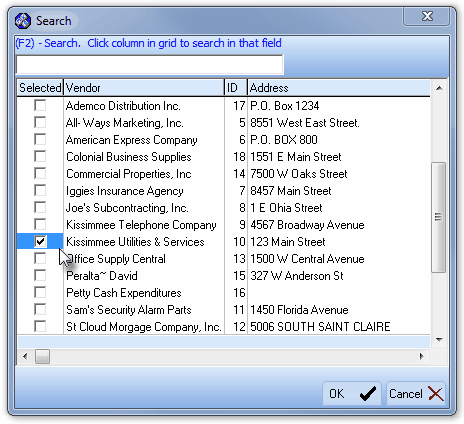
Vendor Selection dialog
| o | Check each Vendor whose Call Entries are to be included in the report. |
| o | Use the method outlined above in "Using the Search dialog" to make your Vendor selection(s) |
| • | Date Range - Enter the time frame, based on when the Calls were recorded, for Call Entries that are to be included. |
| ▪ | From - By default, the Starting Date will be one month prior to Today at 8:00AM. |
| o | Use the Drop-Down Date Selection Box to Choose a different Starting Date, if required. |
| o | Modify the Starting Time, if appropriate. |
| ▪ | To - By default, the Ending Time will be Today at 8:00PM. |
| o | Use the Drop-Down Date Selection Box to Choose a different Ending Date, if required. |
| o | Modify the Ending Time, if appropriate. |
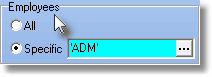
| • | Employees - Click on the appropriate button to include Calls recorded by All Employees, or Limit the Call Entries to specific Employee(s). |
| ▪ | All - By default, every Employee's Calls will be included. |
| ▪ | Specific - Choose which Employee(s) Calls will be included. |
| o | Specific - The Employee field will be displayed. |
| o | Click the Ellipse to Open the Search dialog shown below. |
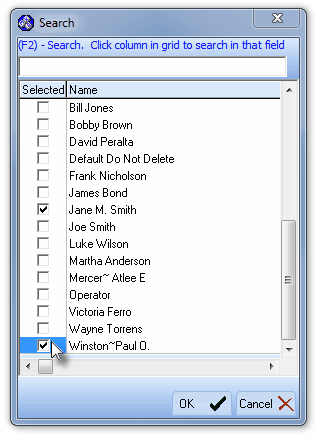
Employees Selection dialog
| o | Check each Employee whose Call Entries are to be included in the report. |
| o | Use the method outlined above in "Using the Search dialog" to make your Employee selection(s) |
| • | Call Source - Click on the appropriate button to include Calls assigned a specific Call Source. |
| ▪ | Specific - The Call Source field will be displayed. |
| o | Click the Ellipse to Open the Search dialog shown below. |
Call Source Selection dialog
| o | Use the method outlined above in "Using the Search dialog" to make your Call Source selection(s) |
| • | Call Status - Calls may be Open (unfinished) or Closed (completed). |
| ▪ | All - By default, all Calls will be included. |
| ▪ | Open - Click Open to have only the unfinished Calls included. |
| ▪ | Closed - Click Closed to have only the completed Calls included. |
| • | Sort By - The Calls Report results may be sorted as follows: |
| ▪ | Call Status - Click this button when you want the Calls Report, based on the filtering selections made above, then sorted by Employees, and then for each Employee, by each Prospect's Closed Calls and then their Open Calls, then by each Subscriber's Closed Calls and then their Open Calls. |
| ▪ | Call Source - Click this button when you want the Calls Report, based on the filtering selections made above, then sorted by Employees, and then for each Employee, by Call Date in Call Source order. |
| ▪ | Call Type - Click this button when you want the Calls Report, based on the filtering selections made above, then sorted by Employees, then by Prospects followed by Subscribers (if both were requested), and within each by Call Type. |
| ▪ | Date - Click this button when you want the Calls Report, based on the filtering selections made above, then sorted by Employees, then by Prospects in Call Date Order followed by Subscribers in Call Date Order. |
| • | Show Call Data? - Click this button when you want to include the detail of each Call in the Calls Report, |
| • | Charts - Using the Drop-Down Selection List provided, you may request that a Pie or Bar Chart be included as part of this report's output. |
| • | Print - Click the Print button  to Preview and optionally Print (to a File or a Printer) this Calls Report. to Preview and optionally Print (to a File or a Printer) this Calls Report. |
| □ | Preview - The Preview tab presents the Calls Report which resulted from the Options you've selected. |
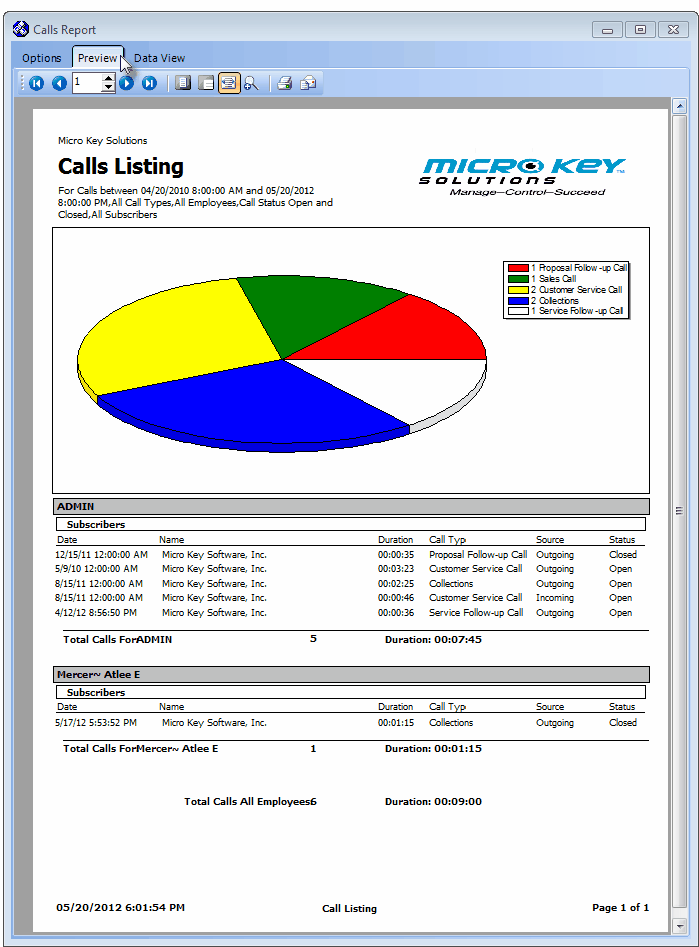
Calls Report - Preview tab without Call Data detail
| • | Home -  - Using either the screen or your Keyboard's Home key, moves the report to the top of the first page. - Using either the screen or your Keyboard's Home key, moves the report to the top of the first page. |
| • | End -  - Using either the screen or your Keyboard's End key, moves the report to the bottom of the last page. - Using either the screen or your Keyboard's End key, moves the report to the bottom of the last page. |
| • | Arrows - The arrows allow you to move back and forth, from page to page. |
| • | Number - Indicates the page number you are viewing. |
| • | You may also type in a specific page number, Press 8 Enter and that page will be displayed immediately. |
| • | If you enter an invalid page number, it will be ignored. |
| • | Fit To Page - Click the first button after the arrows to size a full page of the report to fit the screen. |
| • | Zoom To 100% - Click the second button after the arrows to display the page at 100% (of the printed view). |
| • | Fit To Page Width - Click the third button after the arrows to size the page of the report to fit the full width of the screen. |
| • | Zoom To Percentage - Click the fourth button after the arrows to re-size the page of the report by percentage. |

| • | When you Click the Zoom To Percentage button, the Percentage selector will be displayed. |
| • | You may then Click the Up or Down ‚ arrows to set the exact amount of Zoom you want. |
| • | Print - Click the Print button to Print (to a File or a Printer)  the displayed Calls Report. the displayed Calls Report. |
| • | Email - Click the Email button  to send the Report to an Email Address of your choosing. to send the Report to an Email Address of your choosing. |
| • | Exit the Preview Form by Clicking the Close button x on the right at the top of the Preview Form. |
| □ | Data View - This view provides a tabular (spreadsheet style) presentation of the selected data. |
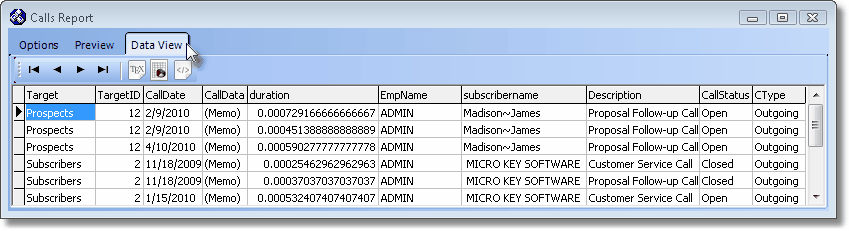
| • | Arrows - Click the arrows to move through the record. |
| • | Export - Exporting the data from this Data View Form (note the "fly-over" help available on these buttons): |
| • | Export to CSV - Click the first button after the arrows to export the data to a Comma Separated Values (CSV) file format. |
| • | Export To Excel - Click the second button after the arrows to export the data to an Excel (.xls) file format. |
| • | Export To Html - Click the third button after the arrows to export the data to an HTML formatted file. |
| • | Exit the Data View Form by Clicking the Close button x on the right at the top of the Data View Form. |

