| □ | This Audit Report allows you to specify the Date Range to be reported, the data entries, processes, and changes that occurred [e.g. the Form(s), Employee(s), Account(s), Table(s), User(s), etc.], and the Type of the Data Related Events to be included in the report. |
| • | The only Data Related Events that are available for this Audit Report are those that are executed by Employees who are members of an Employee Group whose assigned Forms have Access Rights for Audit, or have been specifically assigned to Forms with an Audit setting. |
| • | To print the Audit Report, on the Main Menu Select Reports and Choose the Audit Reports sub-menu, then Select the Audit option. |
| □ | Audit Report tabs - There are three tabs on the Audit Report dialog. |
| • | Options - Initially only the Options tab is shown (until you make your Options selections and Select Print). |
Audit Report dialog
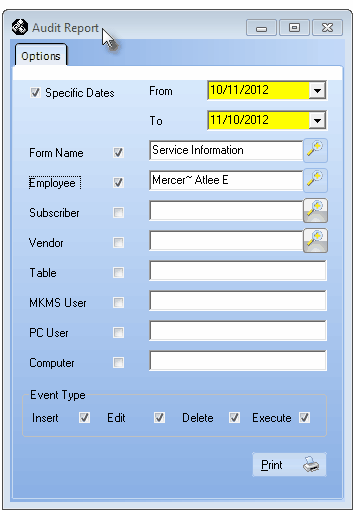
| • | The Audit Report dialog will be displayed. |
| • | Specific Dates - Establish the Date Range of data events that are to be reported. |
| ▪ | From - By default, one month ago. Use the Drop-Down Date Selection Box to change this date, if required. |
| ▪ | To - By default, Today. Use the Drop-Down Date Selection Box to change this date, if required. |
| • | Choices - Unless specific Form(s), Employee(s), Account(s), Table(s), User(s), etc. are chosen, all system based database updates and report processing events will be listed. |
| • | In order to limit the information to actually what is needed to complete the required audit procedure, Check as many of these choices, as appropriate, to refine the data set to be viewed. |
| • | Once any of these choices are Checked, the data events reported may include information relating to the other choices, without limitation. |
| ▪ | For example, if you've chosen to report on a specific Form Name, everyone who made data changes in that Form within the Date Range specified will be included in the report. You could then limit the report to changes made by a specific Employee who accessed a specific Form by specifying both the Form Name and the Employee. |
| ▪ | In another example, if you wanted to view all of the changes made to a specific Subscriber record, you would Check the Subscriber box and locate that specific Account. |
| • | Form Name - By default, no Form Name selection is made. |
| ▪ | Check this box to enter the specific Form Name that you want to be audited. |
| ▪ | Click the Search Icon  to open the Advanced Search dialog to locate a specific Form Name. to open the Advanced Search dialog to locate a specific Form Name. |

Form Search dialog
| • | Employee - By default, all Employees will be included. |
| ▪ | To limit this Audit Report to changes made by one Employee, Check the Employee box to open the Search dialog and Choose the specific Employee to be reported. |
| • | Subscriber - By default, All Subscribers will be included. |
| ▪ | To limit this Audit Report to changes made for one Subscriber, Check the Subscriber box to open the Search dialog and Choose the specific Subscriber to be reported. |
| • | Vendor - By default, All Vendors will be included. |
| ▪ | To limit this Audit Report to changes made for just one Vendor, Check the Vendor box to open the Search dialog and Choose the specific Vendor to be reported. |
| • | Table - By default, All Tables in the selected MKMS Company Database will be included. |
| ▪ | To limit this Audit Report to changes made in one database table, Check the Table box and type in the specific Table name to be reported. |
| • | MKMS User - By default, All MKMS Users with access to the selected MKMS Company Database will be included. |
| ▪ | To limit this Audit Report to changes made by one MKMS User, Check the MKMS User box and type in the MKMS Username to be reported. |
| • | PC User - By default, All PC Users accessing the selected MKMS Company Database will be included. |
| ▪ | To limit this Audit Report to changes made by one PC User, Check the PC Users box and type in the PC User Name to be reported. |
| • | Computer - By default, All Computers accessing the selected MKMS Company Database will be included. |
| ▪ | To limit this Audit Report to changes made from a designated Computer, Check the Computer box and type in the Computer Name to be reported. |
| • | Event Type - There are four Event Types which constitute the available Access Rights that may be assigned. |
| ▪ | Insert - Create a New Record. |
| ▪ | Edit - Modify an existing record. |
| ▪ | Delete - Remove an existing record. |
| ▪ | Execute - Start a system process. |
| • | Print - Click the Print button  to Preview and optionally Print (to a File or a Printer) this Audit Report. to Preview and optionally Print (to a File or a Printer) this Audit Report. |
| • | Preview - The Preview tab presents the report which resulted from the Options you've selected. |
| • | Header Bar - Each listed Event contains a Header Bar with the Event ID, Form (if appropriate), Table (if appropriate), Field (if appropriate), Date & Time, Event's Type and the Employee Code, MKMS User, PC User, and Computer's Name. |
| • | Event Description - A concise description of the transaction and related information, if appropriate. |
| • | Up Arrow/Down Arrow - hi - Moves the report one line up, or one line line down, respectively. |
| • | Page Up/Page Down - Moves the report to the previous or next page, respectively. |
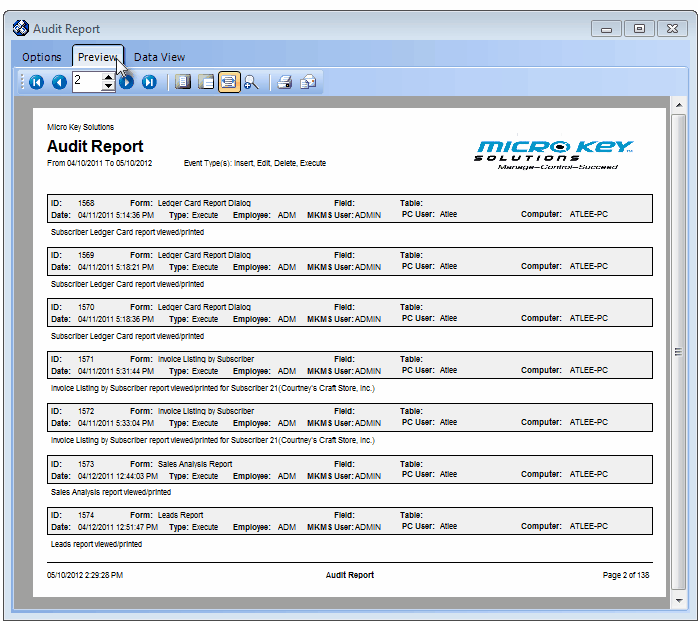
Audit Report - Preview tab
| • | Arrows - The arrows allow you to move back and forth, from page to page. |
| • | Number - Indicates the page number you are viewing. |
| ▪ | You may also type in a specific page number, Press 8 Enter and that page will be displayed immediately. |
| ▪ | If you enter an invalid page number, it will be ignored. |
| • | Fit To Page - Click the first button after the arrows to size a full page of the report to fit the screen. |
| • | Zoom To 100% - Click the second button after the arrows to display the page at 100% (of the printed view). |
| • | Fit To Page Width - Click the third button after the arrows to size the page of the report to fit the full width of the screen. |
| • | Zoom To Percentage - Click the fourth button after the arrows to re-size the page of the report by percentage. |

| ▪ | When you Click the Zoom To Percentage button, the Percentage selector will be displayed. |
| ▪ | You may then Click the Up or Down ‚ arrow to set the exact amount of Zoom you want. |
| • | Print - Click the Print button to Print (to a File or a Printer)  the displayed Audit Report. the displayed Audit Report. |
| • | Email - Click the Email button  to send the Report to an Email Address of your choosing. to send the Report to an Email Address of your choosing. |
.
| • | Data View - This view provides a tabular (spreadsheet style) presentation of the selected data. |
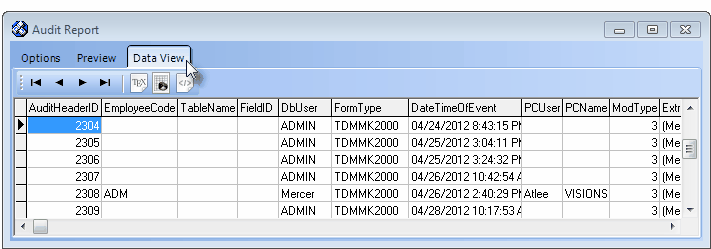
Audit Report - Data View tab
| • | Arrows - Click the arrows to move through the record. |
| • | Export - Exporting the data from this Data View Form (note the "fly-over" help available on these buttons): |
| ▪ | Export to CSV - Click the first button after the arrows to export the data to a Comma Separated Values (CSV) file format. |
| ▪ | Export To Excel - Click the second button after the arrows to export the data to an Excel (.xls) file format. |
| ▪ | Export To Html - Click the third button after the arrows to export the data to an HTML formatted file. |
| • | Exit the Form by Clicking the Close button x on the right at the top of the Form. |

