| □ | The MKS Connection Manager is used to properly "link" your individual Company databases to the MKMS Sybase Anywhere Database Engine. |
| • | Once MKMS is installed, you should "link" the MKMS.db and MKMSDefault.db database files to the MKMS Sybase Anywhere Database Engine using the MKS Connection Manager. |
| • | Each database which will be accessed by MKMS and/or MKMSCS should also have an ODBC Connection defined. |
| • | The MKS Connection Manager program is located at "C:\Program Files\MKS\MKMS\" and is named ConnManager.exe. |
| ► | Note #1: If running Windows® 7 as a 64 bit operating system, the MKS Connection Manager program's location will be: |
"C:\Program Files(x86)\MKS\MKMS\"
| i. | Each database which will be accessed by MKMS and/or MKMSCS must have an ODBC Connection defined. |
| ii. | Each database should be linked using this Connection Manager utility. |
| • | As recommended in Getting Started, create a shortcut for this application and place it in your MKMS folder on your Desktop for quick access later. |
| □ | Running the MKS Connection Manager application: |
| • | Double-Click the Connection Manager to open the MKS Connection Manager dialog. |
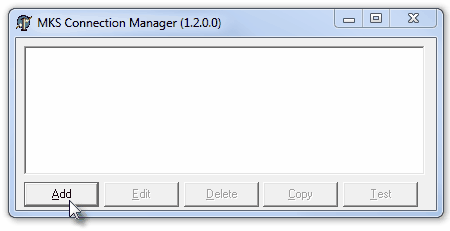
MKS Connection Manager dialog without Databases
| • | If none (or not all) of the MKMS related databases are listed, Click the Add button to display the Connections dialog (shown below in the "The Connections dialog" section). |
| • | Usually the MKMS databases that were installed will be listed automatically unless you are here as part of the initial MKMS Installation process. |
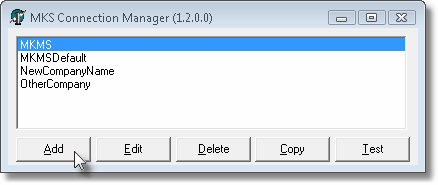
MKS Connection Manager dialog with Databases listed
| • | If databases are listed, unless one is specifically selected (Click on the Database Name to make a selection), the only option available is Add. |
| • | Once a Database Name is Selected, all of the options are activated (see illustration above) and available. |
| • | Click either the Add Edit, or Copy buttons to display the Connections dialog (shown below). |
| • | There are three tabs on the Connections dialog: |
| 1. | Database - This is the tab used to enter the basic information for this Connection. |
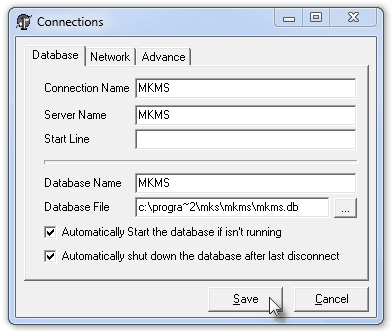
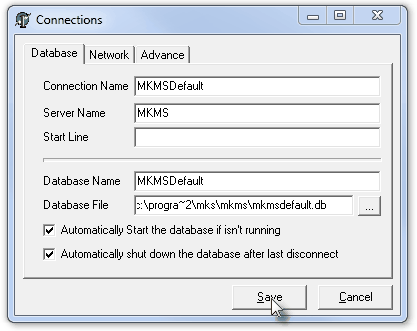
Connections form with the Database tab displayed - with two example entries shown
| ▪ | Connection Name -Name of this Connection (initially MKMS, then the Company Name - usually the Company whose data is in MKMSDefault, an additional Company Name - see Multiple Companies - or the Virtual Printer name). |
| ▪ | Server Name - This is typically going to be "MKMS". |
| o | If not, check with your System Administrator to get the Server Name they have chosen. |
| ▪ | Start Line - Do not use. |
| ▪ | Database Name - The actual Database Name (e.g., MKMS, MKMSDefault, or any additional Company Name's Database that you have installed). |
| ▪ | Database File - The actual Path and Database name to which the Server should be connected (usually MKMS). |
c:\progra~2\mks\mkms\mkmsdefault.db
| ► | Note: As shown in the examples above, those Users operating on a 64 bit Windows® machine must have a ~2 extension after c:\progra |
Those Users operating on a standard 32 bit Windows® machine must instead have a ~1 extension after c:\progra
| ▪ | Automatically Start the database if isn't running - Check box to start if not running. |
| ▪ | Automatically shut down the database after last disconnect - Check box to shut down after the last connection is disconnected. |
| 2. | Network - This tab could be used to enter network related information for this Connection. |

Connections form with the Network tab displayed
| ► | Note: If you are running MKMS on a stand-alone PC, there is no need to Check any boxes, or make any other entries on this Network tab. |
| ▪ | TCP/IP - No entry is required when defining the database connection on the Network Server machine. |
| o | If running on a Windows® Network and are not running the MKS Cluster application, and |
| i. | You are defining a Work Station database connection on that Windows® Network, then Check the TCP/IP box. |
| ii. | Do not enter a default TCP/IP address. |
| o | However, if you are running the MKS Cluster application (or have any issues with making Connections), Technical Support may provide specific instructions for additional TCP/IP entries. |
| ▪ | SPX - Not needed (These network protocols and functions are typically no longer required on modern networks). |
| ▪ | Named pipes - Not needed (These network protocols and functions are typically no longer required on modern networks). |
| ▪ | Shared memory - Not needed (These network protocols and functions are typically no longer required on modern networks). |
| ▪ | Compress network packets - Not needed (These network protocols and functions are typically no longer required on modern networks). |
| 3. | Advance - This is the tab used to identify the SQL Anywhere® Database Engine's version number. |
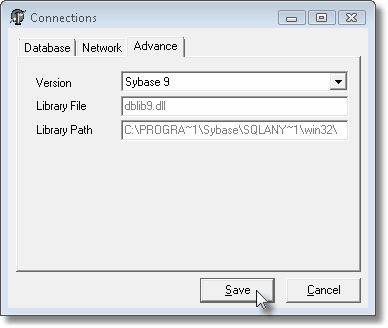
Connections form with the Advance tab displayed
| ▪ | Version - Use the Drop-Down Selection List to Choose the version of the SQL Anywhere® engine currently installed - currently Sybase 9. |
| ▪ | Library File - By default (inserted automatically), "dblib9.dll" (the number following "dblib" will match the SQL Anywhere version Chosen above). |
| ▪ | Library Path - By default (inserted automatically), the location of that "dblibn" file. |
| ► | Note: Even for Users running any 64bit Windows® Version, the "PROGRA~1\Sybase\SQLANY~1\win32\" path would still be shown. |
| □ | Adding and/or Editing Connections |
| • | Click Add to enter an additional Connection. |
| • | Click on a Connection Name and then Click Edit to modify an existing Connection. |
| • | In either case, the Database tab will be displayed. |
| • | The Database tab contains the fields needed to establish the proper connection to the SQL Anywhere® Database Engine. |
| • | Connection Name - Enter the Name of this Connection (the actual Company Name or Virtual Printer name). |
| • | Server Name - This is typically going to be "MKMS". |
| ▪ | If not, check with your System Administrator to get the Server Name they have chosen. |
| • | Start Line - Not needed (These network protocols and functions are typically no longer required on modern networks). |
| • | Database Name - The actual Database Name. |
| • | Database File - Click the Ellipse and locate the actual Database. |
| • | Automatically Start the database if isn't running - Check this box to have this Database started if the Server finds that it is not running. |
| • | Automatically shut down the database after last disconnect - Check this box to shut down this Database after the last connection to the Server is disconnected. |
| • | The Network tab contains the fields that could be used to define the connection to the SQL Anywhere® Database Engine when running in a Network environment. |
| • | TCP/IP - No entry is required when defining the database connection on the Network Server machine. |
| ▪ | If running on a Windows® Network and are not running the MKS Cluster application, and |
| ▪ | You are defining a Work Station database connection on that Windows® Network, then |
| ▪ | Do not enter a default TCP/IP address. |
| ▪ | However, if you are running the MKS Cluster application (or have any issues with making Connections), Technical Support may provide specific instructions for additional TCP/IP entries. |
| • | SPX - Not needed (These network protocols and functions are typically no longer required on modern networks). |
| • | Named pipes - Not needed (These network protocols and functions are typically no longer required on modern networks). |
| • | Shared memory - Not needed (These network protocols and functions are typically no longer required on modern networks). |
| • | Compress network packets - Not needed (These network protocols and functions are typically no longer required on modern networks). |
| • | The Advance tab contains the fields needed identify the SQL Anywhere® engine's version. |
| • | Version - Use the Drop-Down Selection List to Choose version of the SQL Anywhere® engine currently installed. |
| • | Library File - Inserted automatically, "dblib9.dll" (the number following "dblib" will match the SQL Anywhere version Chosen above). |
| • | Library Path - Inserted automatically, this is the location of that "dblibn" file. |
| ► | Note: Even for Users running any 64bit Windows® Version, the "PROGRA~1\Sybase\SQLANY~1\win32\" path would still be shown. |
| • | Click the Save button to record this information. |
| □ | Using the Copy button to enter another Connection |
| • | When adding a new Connection, it is sometimes easier to Copy the basic information from an existing Connection to a New Connection record. To do so: |
| • | Update Database tab's fields needed to identify the proper connection to the SQL Anywhere® Database Engine. |
| • | Double-Click the Connection Manager to open the MKS Connection Manager dialog. |
| • | Click on a Connection Name with a format similar to the new one to be created. |
| • | Click the Copy button to add a new Connection based on the information for an existing Connection. |
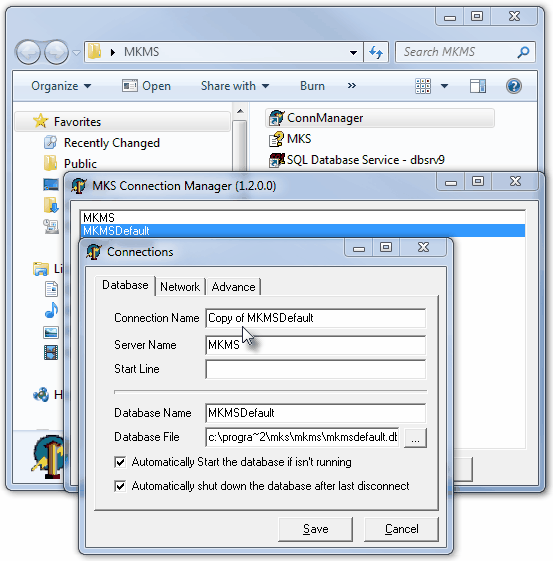
New Connects record created using Copy of an existing Connection
| • | Connection Name - Modify the Name of this Connection as appropriate. |
| • | Server Name - This will usually be "MKMS". |
| • | Start Line - Do not use. |
| • | Database Name - The new Database Name. |
| • | Database File - Click the Ellipse and locate the actual Database. |
| • | Automatically Start the database if isn't running - Check this box to have this Database started if the Server finds that it is not running. |
| • | Automatically shut down the database after last disconnect - Check this box to shut down this Database after the last connection to the Server is disconnected. |
| • | The Network tab fields should not be changed. |
| • | The Advance tab fields should not be changed. |
| • | Click the Save button to record this information. |
| • | To delete an existing Connection: |
| • | Double-Click the Connection Manager to open the MKS Connection Manager dialog. |
| • | Click on a Connection Name to be deleted. |
| • | Click the Delete button to remove a Connection. |

| • | Yes = Confirm that you do want to make the deletion. |
| • | No = Cancel the deletion request. |
| • | To test an existing Connection: |
| • | Double-Click the Connection Manager to open the MKS Connection Manager dialog. |
| • | Click on a Connection Name to be tested. |
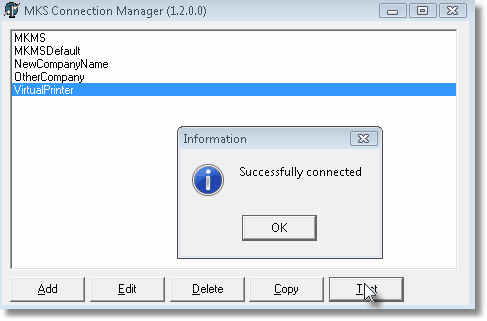
| • | If the selected Connection is correctly defined, a "Successfully connected" message will be displayed. |
| ▪ | Click the OK button to acknowledge this information. |
| • | If the selected Connection is not correctly defined, check the spelling of each entry to insure the information entered is corrected. |

Unable to establish connection Error
| ▪ | If the Connection Test fails verify these items: |
| a) | Is this Database Connection accessible at another Workstation on the Windows® Network? |
| b) | Is SQL Anywhere (dbsrv9) is currently running on the Windows® Server? |
| c) | Is the spelling of the Database name correct (no spaces allowed, case does not matter)? |
| ▪ | If the Connection Test still fails, and this is an additional Application that was not installed as part of the original MKMS CD installation, it may be caused by an ODBC configuration issue. |

