| • | Alarm Dealer Information relating to Scheduled Reports must be entered if you want to have any of your Alarm Dealer(s) receive (daily or periodically scheduled) information about the alarm events that affect them. |
| • | The Scheduled Reports specifically for the Dealers must be defined through the Dealers Form |
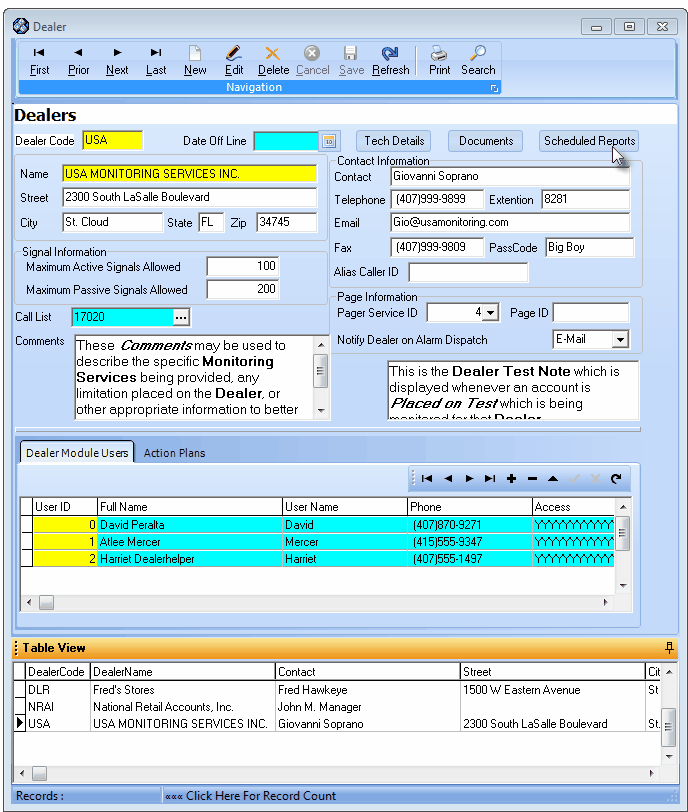
| • | To open the Dealers Form, on the Main Menu of MKMS Choose Maintenance then Select Central Station and Choose the Dealer option. |
Dealers Form - Scheduled Reports button
| • | Click the Scheduled Reports button on the Dealers Form to see the dialog shown below. |
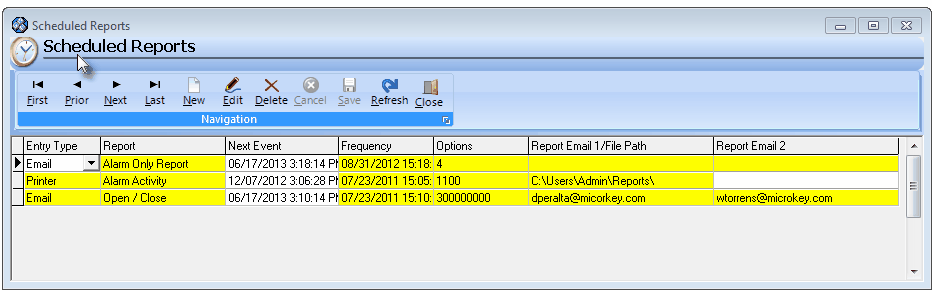
Scheduled Reports Form - Available on the Dealers Form
| • | Scheduled Reports entered this way are "attached" to that Dealer. |
| • | Scheduled Reports relating to Subscribers must be separately identified if you want to have specific Subscribers receive specific Reports about the alarm events that specifically effect them. |
| • | To define Scheduled Reports for Subscribers, open the Subscribers Form. |
| • | Scheduled Reports entered this way are "attached" to that Subscriber. |
| ◆ | The data entry process for defining Scheduled Reports is identical thereafter for both Dealers and Subscribers. |
| □ | To define a Scheduled Report, Click Add (+) and complete each field listed below, as appropriate. |
| • | Entry Type - Use the Drop-Down Selection List to Choose either Fax, Email, or Printer. |
| • | Report - Use the Drop-Down Selection List to Choose the type of report desired. |
| • | When the Scheduled Reports dialog is accessed from within the Dealers Form, these report options are available: |
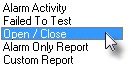
Dealer Report Options
| • | When the Scheduled Reports dialog is accessed from within the Subscribers Form, these report options are available: |
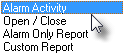
Subscriber form's Report Options
| • | Next Event - This information will be inserted by the system based on the other selections made. |
| • | Frequency - Click on this Frequency field to display the Ellipse. |
| • | Then Click the Ellipse to display the Report Recurrence dialog. |
| • | There are four tabs available to allow you to specify exactly when these reports should be transmitted. |
| 1. | Daily - The Report is to be sent every day. |
| 2. | Weekly - The Report is to be sent one or more days each week, as specified. |
| 3. | Monthly - The Report is to be sent every month on the date specified. |
| 4. | Yearly - The Report is to be sent every year, in the month, and on the date specified. |
| • | Daily - Produce and transmit the selected report Daily as specified: |
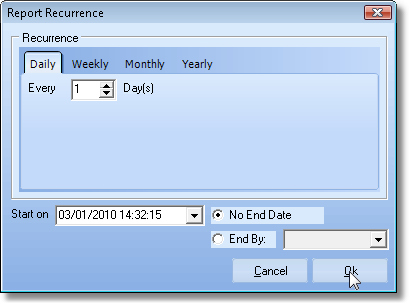
Report Recurrence dialog showing Daily tab
| ▪ | Every nn Days - Enter the number of days between each transmission of this report. |
| o | By default, the number is 1. |
| o | You may revise this number as needed. |
| ▪ | Start on - By default, it will be Today. |
| o | Use the Drop-Down Date Selection Box to Choose a different start date. |
| ▪ | No End Date - Click this button to indicate this is an ongoing request. |
| ▪ | End By - Click this button to indicate this request ends on the specific date. |
| ▪ | Enter date - Use the Drop-Down Date Selection Box to Choose that date. |
| • | Weekly - Produce and transmit the selected report Weekly as specified: |
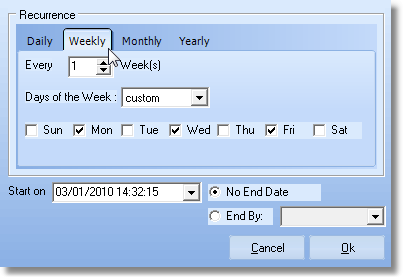
Report Recurrence dialog showing Weekly tab
| ▪ | Every nn Week(s) - Enter the number of weeks between each transmission of this report. |
| o | By default, the number is 1. |
| o | You may revise this number as needed. |
| ▪ | Days of the Week - Using the Drop-Down Selection List to Choose when these reports are to be transmitted. |
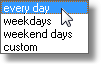
| o | Custom allows you to Check specific days (see illustration above). |
| ▪ | Start on - By default, it will be Today. |
| o | Use the Drop-Down Date Selection Box to Choose a different start date. |
| ▪ | No End Date - Click this button to indicate this is an ongoing request. |
| ▪ | End By - Click this button to indicate this request ends on the specific date. |
| ▪ | Enter date - Use the Drop-Down Date Selection Box to Choose that date. |
| • | Monthly - Produce and transmit the selected report Monthly as specified: |
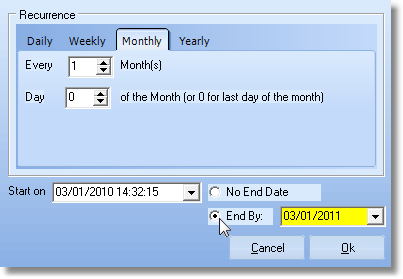
Report Recurrence dialog showing Monthly tab
| ▪ | Every nn Month(s) - Enter the number of months between each transmission of this report. |
| o | By default, the number is 1. |
| o | You may revise this number as needed. |
| ▪ | Day nn of the month (or 0 for last day of the month) - Normally, the last day of the month. |
| o | By default, the number is 0. |
| o | You may revise this number as needed. |
| ▪ | Start on - By default, it will be Today. |
| o | Use the Drop-Down Date Selection Box to Choose a different start date. |
| ▪ | No End Date - Click this button to indicate this is an ongoing request. |
| ▪ | End By - Click this button to indicate this request ends on the specific date. |
| ▪ | Enter date - Use the Drop-Down Date Selection Box to Choose that date. |
| • | Yearly - Produce and transmit the selected report Yearly as specified: |
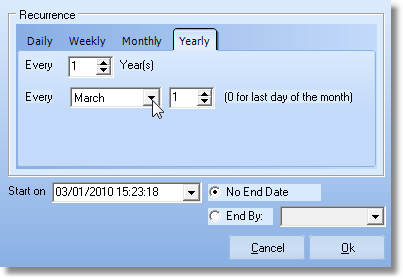
Report Recurrence dialog showing Yearly tab
| ▪ | Every nn Year(s) - Enter the number of years between each transmission of this report. |
| o | By default, the number is 1. |
| o | You may revise this number as needed. |
| ▪ | Every month / day (0 for last day of the month) - Indicate when the report is to be transmitted. |
| o | month - Use the Drop-Down Selection List to Choose the appropriate month. |
| o | day - By default, the number is 1. |
| o | You may revise this number as needed. |
| ▪ | Start on - By default, it will be Today. |
| o | Use the Drop-Down Date Selection Box to Choose a different start date. |
| ▪ | No End Date - Click this button to indicate this is an ongoing request. |
| ▪ | End By - Click this button to indicate this request ends on the specific date. |
| ▪ | Enter date - Use the Drop-Down Date Selection Box to Choose that date. |
| • | Options - Click on this Options field to display the Ellipse. |
| • | Then Click the Ellipse to display the appropriate Options dialog. |
| ▪ | In some cases, the selection of a certain Report requires a specific Option be selected. |
| ▪ | In other cases, a specially entered System defined option is inserted - and this option Number may not be changed. |
| ▪ | In other cases, No Options are available, in which case you will see the informational message shown below. |
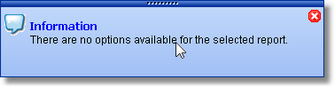
Information box stating that No Options are available
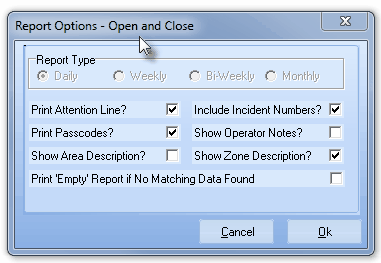
| • | The Reports that do require/offer Options will display a Report Options dialog: |
Open and Close - Scheduled Reports dialog
| o | Report Type - Indicate (Click) the reporting period that is to be provided. |
| o | Print Attention Line? - Check this box to include the Subscriber's Attention Line information on the Open and Close Report. |
| o | Print Passcodes? - Check this box to include the Subscriber's Passcode information on the Open and Close Report. |
| o | Show Area Description? - Check this box to show any Area Descriptions on the Open and Close Report. |
| o | Include Incident Numbers? - Check this box to include Incident Numbers on the Open and Close Report. |
| o | Show Operator Notes? - Check this box to include Operator Notes on the Open and Close Report. |
| o | Show Zone Description? - Check this box to include the Zone Description on the Open and Close Report. |
| o | Print 'Empty' Report if No matching Data Found - Check this box to print reports that would otherwise be blank (thereby still providing the Report Title and Dealer's Name and Address for any "no data" situation). |

Alarm Activity - Scheduled Reports dialog
| o | Show UL Accounts Only - Check this box to only include activity from UL® Accounts. |
| o | Page Break on CSID - Check this box to execute a Page Break after a change of the CSID. |
| o | Print 'Empty' Report if No matching Data Found - Check this box to print blank reports for a "no data" situation. |
| • | If the Custom Report option is selected a different Report Options dialog is displayed. |
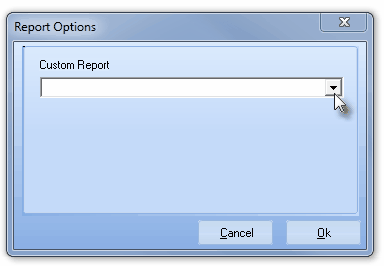
Custom Report - Report Options
| ▪ | Using the Drop-Down Selection List provided, Choose the desired Custom Report format. |
| o | If the Custom Report format designed to be sent to a Dealer, it has to include a Search for Dealer dialog which must be designated as mandatory. |
| o | If the Custom Report format designed to be sent to a Subscriber, it has to include a Search for Subscriber dialog which must be designated as mandatory. |
| • | There are two ways to transmit a Scheduled Report: 1) as a Printer file sent to Disk, or 2) delivered via Email. |

Report Email or Disk, Path entries
| 1. | Printer - Defining a Scheduled Report that will be a Printer file sent to Disk: |
| ▪ | Report Email 1 - If you want to send this report to disk, enter the full Path to the desired file location. |
| ▪ | Report Email 2 - If this will be a Printed Report, do not enter anything in this field. |
| ► | Note: This feature is provided for those that want a copy to make available via their Web Site, or to have a "snapshot" report available, whenever needed. |
| 2. | Email - Defining an Emailed Scheduled Report: |
| ▪ | Report Email 1 - If the Entry Type is Email, enter the primary Report Email address to send the report. |
| ▪ | Report Email 2 - Optionally, if you sent the report as an Email in the Report Email 1 field described above, you may enter the secondary Report Email address, if required. |
| • | Click Save ("ü ") at the top left of the Scheduled Reports Form to save the record, or Click Cancel ("X") to abort the entry. |
| • | Click the Close button to return to the Dealers Form or the Subscribers Form, depending from where this Scheduled Reports Form was opened.. |

