| • | With this volume of Sales-Purchase Items, locating one of them when a Price Update, change of Spelling, or any other situation that requires a User to Modify one of them, may make finding the one needing a modification quite difficult. |
| • | There are several methods listed below that will help you locate a specific record quickly. |

Group, Vendor & Clear Filter(s) button on the Sale-Purchase Items Form
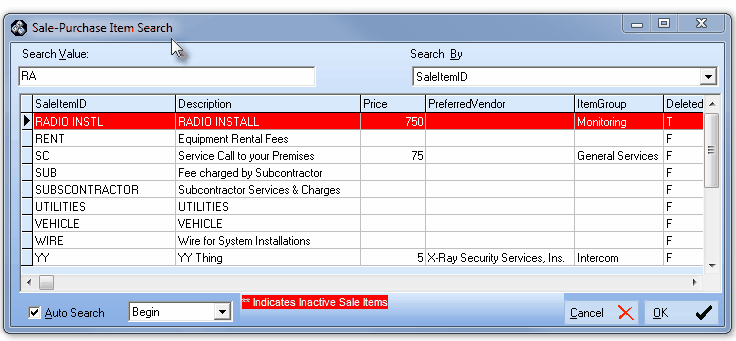
| • | Search - Use the Search Icon on the Navigation Menu at the top of the Sales-Purchase Item Form to open the Sale-Purchase Item Search dialog and locate the required Sales-Purchase Item. |

Sale-Purchase Item Search dialog
| • | Search By - Select the search field you will use to locate the desired Sales-Purchase Item. (The default criteria is initially blank, then it becomes the one that was previously selected.) |

Available Search By options
| ▪ | The Sale-Purchase Item Search list on which the search will be performed will be ordered by (and the first column in the list will be) your Search By selection. |
| ▪ | As the example above, if you selected SaleItemID as your Search By method, the first column will change to Sale Item ID information, and the data listed will be in that order. |
| ▪ | If the item had previously been marked as Inactive, it will be displayed in Red. |
| • | Auto Search - Check this box (located on the bottom left of the Search dialog) to activate the Auto Search function. |
| • | Auto Search performs an incremental search as you type in your Search Value entry. |
| • | By default, when Checked, the Auto Search function will be set for Begin, |
| • | However, using the Drop-Down Selection List, you may Choose any one of these three available methods to locate the needed record. |
| 1. | Begin - The Search Value you type will be compared to the beginning of the Search By criteria you selected. |
| 2. | Partial - The Search Value you type will be compared to the whole line of data to find any matching set of characters in the Search By criteria you selected. |
| ▪ | As an example, entering "MIT" would locate "SMITH". |
| 3. | End - The Search Value you type will be compared to the end of data to find a match based on the Search By criteria you selected. |
| ▪ | What you enter will be compared from the end back to the beginning of the field selected in Search By. |
| • | Type the Search Value - Enter some or most of the Sale Item ID (or whatever the Search By field information should be). |
| • | If the Auto Search option is not Checked, Click the Search button to execute your search. |
| • | Click on the appropriate record. |


