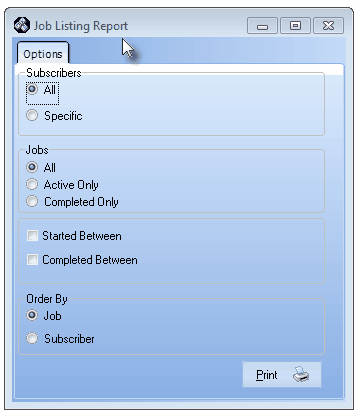
| □ | The Job Listing Report provides a complete list of all (or a selected set of) Jobs that have been entered using the Version 2.0 Job Costing Form. |
| • | On the Main Menu Select Reports and Choose Job Costing, then Select either Job Costing 2.0 and Click Job Listing. |
| □ | Job Listing Report tabs - There are two tabs on the Job Listing Report dialog. |
| • | Options - Initially only the Options tab is shown (until you make your Options selections and Select Print). |
Job Listing Report default dialog
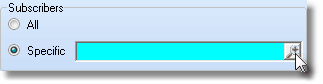
| • | Subscribers - Select which Subscribers are to be included in the Job Listing. |
| • | All - Any Subscriber with a Job recorded (based on further selections below). |
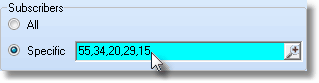
| • | Specific - A selected Subscriber's Job(s). |
Subscribers selection area for All or Specific Subscriber
| ▪ | If Specific is selected, Click the Search Icon to display the Select Subscriber dialog. |
| ▪ | Check each Subscriber record - as many as needed - to be included in the report. |
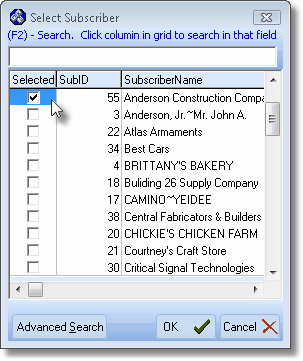
Select Subscriber dialog
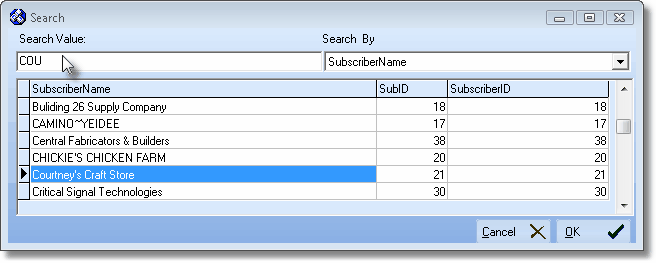
| ▪ | To locate more than one record in a long list, do the following: |
| ▪ | Click any record within the column grid that you want to search in order to locate the desired record. |
| o | That specific column will be displayed by itself. |
Select Subscriber dialog
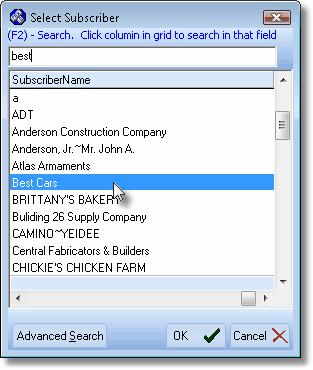
| ▪ | In the (F2) - Search field, type the characters that will locate the desired record. |

| ▪ | If necessary, move the Slide Bar at the bottom of the Form to the left to display the Check Boxes column. |
| ▪ | Check the desired record. |
| ▪ | Repeat these steps (Check an additional record, or (F2) - Search for the next record and Check that additional record) until you have selected all the Subscribers that you want reported. |
| ▪ | Click OK üwhen you have located and Checked all of the desired records. |
| ▪ | The Subscriber Search dialog will Close and all of the selected record numbers will be inserted into the Specific field. |

| • | Optionally, you may use the Advanced Search dialog by Clicking the Advanced Search button to open the Subscriber Search dialog. |
| ▪ | Once you have chosen the desired Subscriber, Click OK. |
| ▪ | That Subscriber's record will also be Checked (and included in the record numbers inserted into the Specific field). |
| • | Jobs - Specify which Jobs are to be included. |
| • | All - Any Job, whether Active or not, is to be listed. |
| • | Active Only - Only Jobs that are still Active are to be listed. |
| • | Completed Only - Only Jobs that have been completed are to be listed |
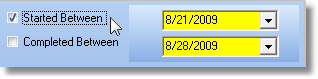
| • | Started Between / Completed Between - You may also specify, if appropriate, the Jobs Start-up Date Range or Completion Date Range, to be included in the list. |
| • | Started Between - To set a Date Range which will list only those Jobs that were Started within that Date Range, Check this box. |
| • | Completed Between - To set a Date Range which will list only those Jobs that were Completed within that Date Range, Check this box. |
| • | Date Range - Using the Drop-Down Date Selection Box es provided, Choose the appropriate Starting and Ending Dates. |
Started Between / Completed Between dialog
| • | Order By - You may specify the order which the Jobs are to be listed. |
| • | Job - List in Job Number Order. |
| • | Subscriber - List alphabetically based on the Subscriber's name. |
| • | Print - Click the Print button  to Preview and optionally Print (to a File or a Printer) this Job Listing report. to Preview and optionally Print (to a File or a Printer) this Job Listing report. |
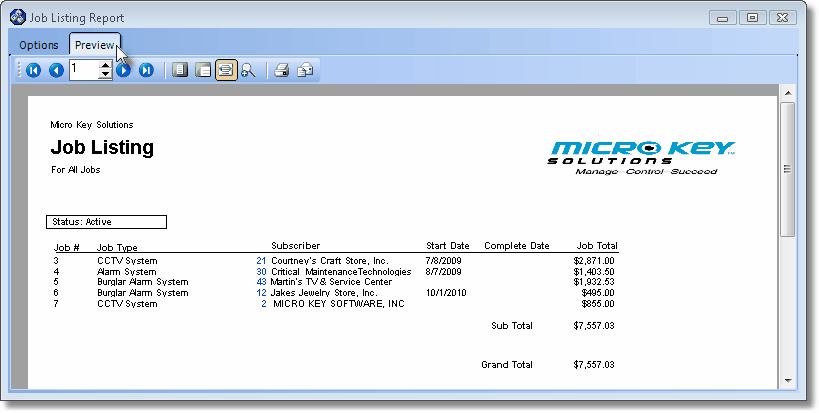
| □ | Preview - The Preview tab presents the report which resulted from the Options you've selected above. |
| • | Up Arrow/Down Arrow - hi - Moves the report one line up, or one line line down, respectively. |
| • | Page Up/Page Down - Moves the report to the previous or next page, respectively. |
Job Listing Report Preview
| • | The Subscriber ID is displayed in Blue. |
| • | Click on an ID number and the Subscribers Form that is listed next to that ID number will be displayed. |
| • | Home -  - Using either the screen icon or your Keyboard's Home key, moves the report to the top of the first page. - Using either the screen icon or your Keyboard's Home key, moves the report to the top of the first page. |
| • | End -  - Using either the screen icon or your Keyboard's End key, moves the report to the bottom of the last page. - Using either the screen icon or your Keyboard's End key, moves the report to the bottom of the last page. |
| • | Arrows - The arrows allow you to move back and forth, from page to page. |
| • | Number - Indicates the page number you are viewing. |
| • | You may also type in a specific page number, Press 8 Enter and that page will be displayed immediately. |
| • | If you enter an invalid page number, it will be ignored. |
| • | Fit To Page - Click the first button after the arrows to size a full page of the report to fit the screen. |
| • | Zoom To 100% - Click the second button after the arrows to display the page at 100% (of the printed view). |
| • | Fit To Page Width - Click the third button after the arrows to size the page of the report to fit the full width of the screen. |
| • | Zoom To Percentage - Click the fourth button after the arrows to re-size the page of the report by percentage. |

| • | When you Click the Zoom To Percentage button, the Percentage selector will be displayed. |
| • | You may then Click the Up or Down ‚ arrow to set the exact amount of Zoom you want. |
| • | Print - Click the Print button to Print (to a File or a Printer)  the displayed Sales Taxes Invoiced Report. the displayed Sales Taxes Invoiced Report. |
| • | Email - Click the Email button  to send the Report to an Email Address of your choosing. to send the Report to an Email Address of your choosing. |

