| □ | Having the capability to Import a batch of Receipts from Dealers, large Companies, and Governmental Agencies that have a large number of Accounts being monitored and serviced by your Company, and have those Receipts automatically Allocated during that Import procedure, saves time and money for both parties. |
| • | With the addition of the ability to Allocate portions of those Receipts to specifically designated Invoice Line Items incorporated into this Import process, this utility has become very valuable to those Alarm Companies that need it. |
| • | However, not everyone uses the same file format when processing these receipts. |
| • | The Payment Import Form provides for the: |
| • | Definition of any number of Payment Import file formats. |
| • | Selection of the appropriate Payment Import file definition. |
| • | Selection of the Payment Import file with the actual Receipts Data. |
| • | Selection of the Bank to which these Receipts will be deposited. |
| • | Loading those Receipts contained in the Payment Import file. |
| • | Importation of those Receipts and the automatic Allocation of those Receipts to the proper Invoice(s) and, where defined, the Invoice Line Items. |
| • | To use this custom Import format feature, on the Main Menu, Select Maintenance and then Choose the Accounts Receivable sub-menu, then Click Pay Import and Choose Import. |
| • | The Payment Import dialog will be displayed. |
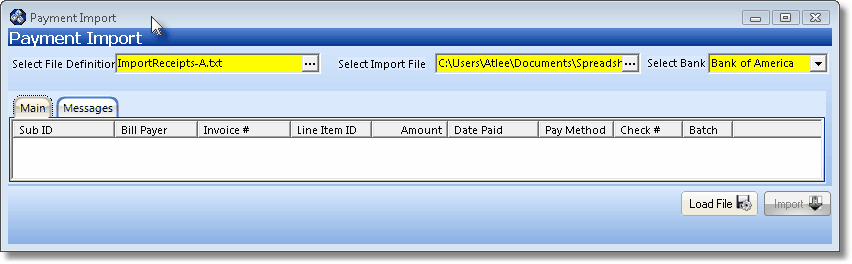
Payment Import dialog
| • | These are the 7 steps required to custom define a Payment Import file format, then using that file format, import Receipts and automatically Allocate those Receipts. |
| 1. | Open the Payment Import Form. |
| 2. | Define Payment Import file format, if required. |
| 3. | Select the required Payment Import file definition. |
| 4. | Select the Payment Import file with the actual Receipts Data. |
| 5. | Select the appropriate Bank account in which these Receipts will be deposited. |
| 6. | Load the Payment Import file with the actual Receipts Data. |
| 7. | Process the Receipts Data. |
| □ | Open the Payment Import Form: |
| • | On the Main Menu, Select Maintenance and then Choose the Accounts Receivable sub-menu, then Click Pay Import and Choose Import. |
| • | The Payment Import dialog will be displayed. |
| □ | Define Payment Import file format, if required: |
| • | Click the Ellipse  button on the right of the Select File Definition field. button on the right of the Select File Definition field. |
| • | The Import Definitions dialog will be displayed. |
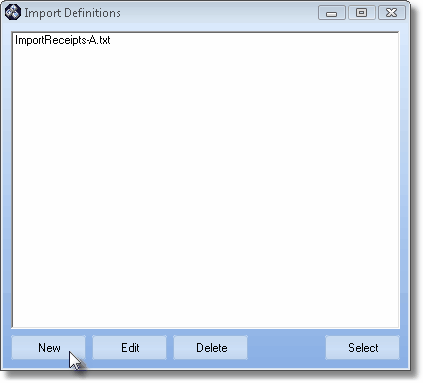
Import Definitions form opened from the Payment Import dialog
| • | Click the New button to create a new Import Definition. |
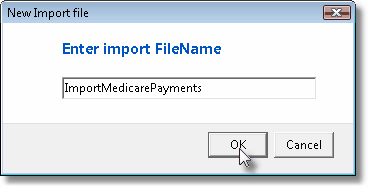
Enter the File Name for the New Import File definition
| • | Enter a name for this New Import File. |
| • | The Name you enter should have no extension - the system will apply a ".def" extension for this Import Definition. |
| • | This file will be created in the C:\Program Files\MKS\MKMS folder. |
| • | Click OK to record the New Import File's name. |
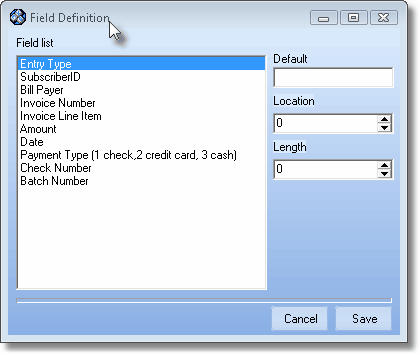
Field Definitions form used for entering a New Import File
| • | The Field Definitions dialog will be displayed (see above). |
| • | Field Definitions - Each field name in the Field list has three properties: |
| 1. | Default - If there is an assumed value for this field, enter that value here. |
| ▪ | If there is no assumed default value, leave the property blank, but reserve a space for it in the Import Definition. |
| 2. | Location - The starting position, within each line of data, of this field name's information. |
| ▪ | Each line of data represents a portion of the total Receipt Amount that is to be posted to an Invoice, or to a specific Line Item within an Invoice. |
| 3. | Length - The maximum length of this field name's data. |
| ► | Note: The properties of each member of the Field list must be defined, even if one or more of those properties are blank, or zero (0). |
| • | Click the Save button to record this set of Field Definitions for the New Import File. |
| □ | Select the required Payment Import file definition: |
| • | Once you have defined the required Import Definitions, |
| • | Click the Ellipse button on the right of the Select File Definition field. |
| • | The Import Definitions dialog will be displayed. |
| • | Choose the Import Definitions that you want to use. |
| • | Click the Select button on the Import Definitions dialog. |
| • | The selected Import Definition will be inserted into the Select File Definition field on the Payment Import Form. |
| □ | Select the Payment Import file with the actual Receipts Data: |
| • | Click the Ellipse button on the right of the Select Import File field. |
| • | Locate the actual Receipts Data file using the standard Windows Open interface. |
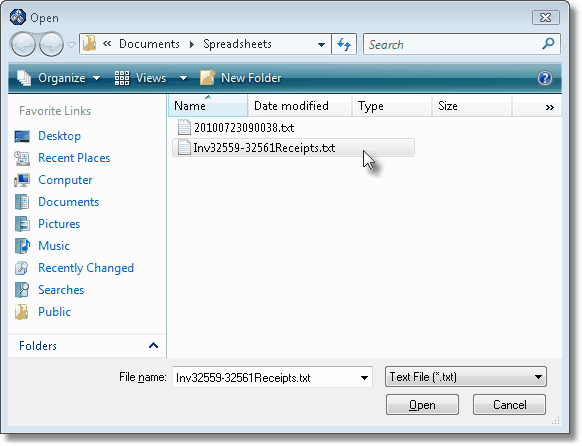
Using the Standard Windows Open file dialog to locate the Payments Import file
| • | Select the desired file and Click the Open button. |
| • | That Payment Import file will be inserted into the Select Import File field on the Payment Import Form. |
| □ | Select the appropriate Bank account in which these Receipts will be deposited: |
| • | Select Bank - Using the Drop-Down Selection List provides Choose the Bank into which these Receipts will be deposited. |
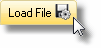
| □ | Load the Payment Import file with the actual Receipts Data: |
| • | Load File - Click the Load File button to import the data into a temporary table within MKMS to await importation and processing within your database. |
| • | Main tab - The Payment Import file will be processed and each payment within the file will be listed in the Main tab on the Payment Import Form. |
| • | Messages - Error messages relating this data will be listed in the Messages tab on the Payment Import Form. |
| □ | Process the Receipts Data into MKMS: |
| • | Import - Click the Import button to import the data from the temporary table into MKMS, process those payments, and allocate them to the appropriate Invoices in your database. |

| • | Exceptions tab - Processing exceptions (and errors) will be displayed in the Exceptions tab. |
| • | If the Exceptions tab does not appear, all Payment Import transactions processed as expected. |

