| □ | The Taxes Billed Report provides a list of all Bills entered for a specified period, and which - and at what rate - of each of the Bill's Invoice Items were charged Sales Tax. |
| • | Depending on the Vendors from whom you make your Purchases, where they are physically located, and if they will (or will not) assess Sales Tax on those Purchases, you may be required to separately pay certain Sales Taxes directly to your state's Department of Revenue - particularly for items that are not Purchases For Resale and that is assuming they will be charged Sales Tax at the retail level. |
| • | To print the Taxes Billed Report, on the Main Menu Select Reports, Choose the Accounts Payable sub-menu and Click Taxes Billed. |
| □ | Taxes Billed Report tabs - There are three tabs on the Taxes Billed dialog. |
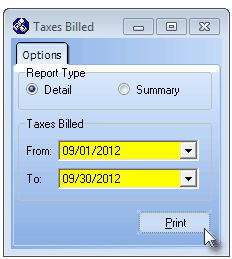
| • | Options - Initially only the Options tab is shown (until you make your Options selections and Select Print). |

Taxes Billed Report - Options tab
| • | Report Type - How much detail is needed? |
| ▪ | Detail - Be default, each Line Item that was charged Sales Tax on a Bill will be listed with Purchase Amount, the Tax Rate and total Sales Tax Charged, sub-totaled for each Vendor Classification. |
| ▪ | Summary - Click Summary to list the total Sales Tax that was Billed, with sub-totals for each Vendor Classification. |
| • | Taxes Billed - Specify the Date Range for this report. |
| ▪ | From - By default, it will be the First of the Month of the most recently completed month. Use the Drop-Down Date Selection Box to Choose the required date. |
| ▪ | To - By default, it will be the Last of the Month of the most recently completed month. Use the Drop-Down Date Selection Box to Choose the required date. |
| • | Print - Click the Print button to Preview or Print (to a File or a Printer) this Taxes Billed report. |
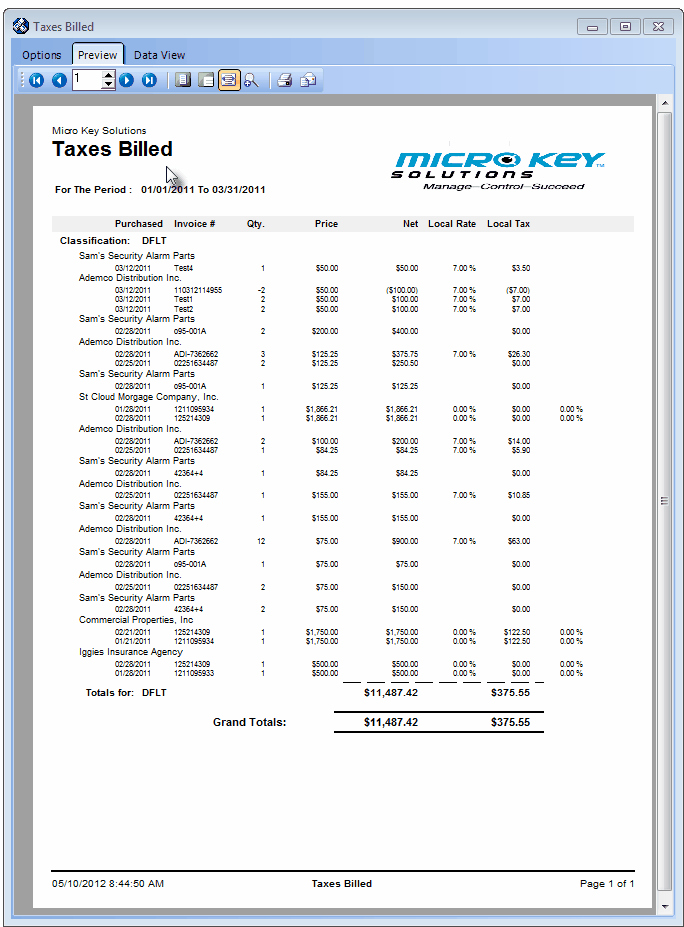
| • | Preview - The Preview tab presents the report which resulted from the Options you've selected. |
| • | Up Arrow/Down Arrow - hi - Moves the report one line up, or one line line down, respectively. |
| • | Page Up/Page Down - Moves the report to the previous or next page, respectively. |

Taxes Billed Report - Preview tab - showing the Detailed version
| • | Home -  - Using either the screen or your Keyboard's Home key, moves the report to the top of the first page. - Using either the screen or your Keyboard's Home key, moves the report to the top of the first page. |
| • | End -  - Using either the screen or your Keyboard's End key, moves the report to the bottom of the last page. - Using either the screen or your Keyboard's End key, moves the report to the bottom of the last page. |
| • | Arrows - The arrows allow you to move back and forth, from page to page. |
| • | Number - Indicates the page number you are viewing. |
| ▪ | You may also type in a specific page number, Press 8 Enter and that page will be displayed immediately. |
| ▪ | If you enter an invalid page number, it will be ignored. |
| • | Fit To Page - Click the first button after the arrows to size a full page of the report to fit the screen. |
| • | Zoom To 100% - Click the second button after the arrows to display the page at 100% (of the printed view). |
| • | Fit To Page Width - Click the third button after the arrows to size the page of the report to fit the full width of the screen. |
| • | Zoom To Percentage - Click the fourth button after the arrows to re-size the page of the report by percentage. |

| ▪ | When you Click the Zoom To Percentage button, the Percentage selector will be displayed. |
| ▪ | You may then Click the Up or Down ‚ arrows to set the exact amount of Zoom you want. |
| • | Print - Click the Print button to Print (to a File or a Printer)  the displayed Taxes Billed Report. the displayed Taxes Billed Report. |
| • | Email - Click the Email button  to send the Report to an Email Address of your choosing. to send the Report to an Email Address of your choosing. |
| • | To Exit the Preview tab and Close this Report dialog Form, Click the Close button x on the right at the top of the Preview tab. |
| • | Data View - This view provides a tabular (spreadsheet style) presentation of the selected data. |

Taxes Billed Report - Data View tab
| • | Arrows - Click the arrows to move through the record. |
| • | Export - Exporting the data from this Data View tab (note the "fly-over" help available on these buttons): |
| ▪ | Export to CSV - Click the first button after the arrows to export the data to a Comma Separated Values (CSV) file format. |
| ▪ | Export To Excel - Click the second button after the arrows to export the data to an Excel (.xls) file format. |
| ▪ | Export To Html - Click the third button after the arrows to export the data to an HTML formatted file. |
| • | To Exit the Data View tab and Close this Report dialog Form, Click the Close button x on the right at the top of the Data View tab. |


![]()
