| □ | How many Monitored Accounts do you have in each Account Type, and totally? |
| • | The Monitored Accounts List provides this information. |
| • | To view the Monitored Accounts List, on the Main Menu Select Reports and Choose the Central Station sub-menu then Click Monitored Accounts. |
| □ | Monitored Accounts List tabs - There are three tabs on the Monitored Accounts List dialog. |
| • | Options - Initially only the Options tab is shown (until you make your Options selections and Select Print). |
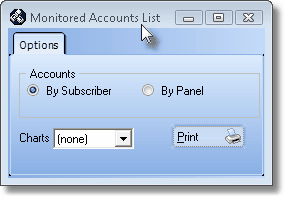
Monitored Accounts List Options dialog
| • | Accounts - Select how this data is to be reported: |
| ▪ | By Subscriber - The count is calculated based on the number of Subscribers that are assigned the various Account Types. |
| ▪ | By Panel - Because many Subscribers may have more than one Subscriber Panel (and therefore CSIDs) defined, you may have the count is calculated based on the number of Subscriber Panels of the Subscribers assigned the various Account Types. |
| • | Charts - Using the Drop-Down Selection List provided, you may request that a Pie or Bar Chart be included as part of this report's output. |
| • | Print - Click the Print button  to Preview and optionally Print (to a File or a Printer) this Monitored Accounts List. to Preview and optionally Print (to a File or a Printer) this Monitored Accounts List. |
| • | Preview - The Preview tab presents the report which resulted from the Options you've selected. |

Monitored Accounts Preview with Pie Chart
| • | Home -  - Using either the screen or your Keyboard's Home key, moves the report to the top of the first page. - Using either the screen or your Keyboard's Home key, moves the report to the top of the first page. |
| • | End -  - Using either the screen or your Keyboard's End key, moves the report to the bottom of the last page. - Using either the screen or your Keyboard's End key, moves the report to the bottom of the last page. |
| • | Arrows - The arrows allow you to move back and forth, from page to page. |
| • | Number - Indicates the page number you are viewing. |
| ▪ | You may also type in a specific page number, Press 8 Enter and that page will be displayed immediately. |
| ▪ | If you enter an invalid page number, it will be ignored. |
| • | Fit To Page - Click the first button after the arrows to size a full page of the report to fit the screen. |
| • | Zoom To 100% - Click the second button after the arrows to display the page at 100% (of the printed view). |
| • | Fit To Page Width - Click the third button after the arrows to size the page of the report to fit the full width of the screen. |
| • | Zoom To Percentage - Click the fourth button after the arrows to re-size the page of the report by percentage. |

| ▪ | When you Click the Zoom To Percentage button, the Percentage selector will be displayed. |
| ▪ | You may then Click the Up or Down ‚ arrows to set the exact amount of Zoom you want. |
| • | Print - Click the Print button to Print (to a File or a Printer)  the displayed Monitored Accounts List. the displayed Monitored Accounts List. |
| • | Email - Click the Email  button to send this report to an Email address of your choosing. button to send this report to an Email address of your choosing. |
| • | Data View - This view provides a tabular (spreadsheet style) presentation of the selected data. |
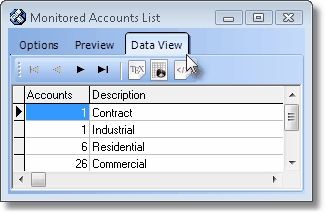
Monitored Accounts List Data View
| • | Arrows - Click the arrows to move through the record. |
| • | Export - Exporting the data from this Data View tab (note the "fly-over" help available on these buttons): |
| ▪ | Export to CSV - Click the first button after the arrows to export the data to a Comma Separated Values (CSV) file format. |
| ▪ | Export To Excel - Click the second button after the arrows to export the data to an Excel (.xls) file format. |
| ▪ | Export To Html - Click the third button after the arrows to export the data to an HTML formatted file. |
| • | To Exit the Data View tab and Close this Report dialog Form, Click the Close button x on the right at the top of the Data View tab. |

