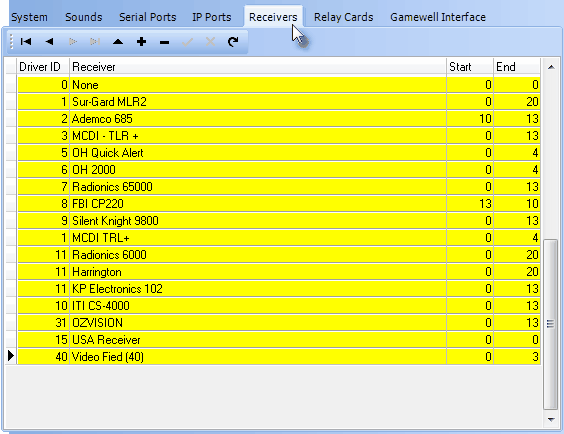
| □ | Receivers tab - Lists supported Receivers information and allows additional Receivers to be added to this list. |
| • | By default, the "standard" Receivers are already listed. |

Receivers tab on the SPA Setup Form
| • | Driver ID - Displays the internal Driver number. |
| ▪ | The Driver number is used by SPA to know how to process signals from this type of Receiver. |
| ▪ | Several Receivers may use the same Driver number (see ID above) because they all send information to the computer in the same manner. |
| • | Receiver - The Receiver's name within the SPA application |
| • | Start - Position of the first Character sent by this Receiver "introducing" a new alarm event Packet. |
| • | End - Last Character sent by this Receiver "closing" the latest alarm event Packet will be this number of characters after the first (Start) character. |
| • | Adding a new Receiver to this Receivers tab - (see the three receivers using Driver ID number 11 in the illustration above, as an example): |
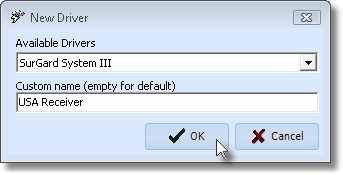
| • | Click Add ("+") to open the New Driver dialog. |

New Driver dialog from the Receivers tab of SPA Setup Form
| ▪ | Available Drivers - Use the Drop-Down Selection List to Choose from among the 50+ Receiver Drivers available. |
| ▪ | Custom name (empty for default) - This is a free form field provided so that you may create a Nickname for this Receiver (rather than displaying the default Receiver Name) when it appears on the Port screen. |
| ▪ | Click the OK button to save all of the added and/or updated Serial Ports information. |

| ▪ | The New Driver Form will close. |
| • | Setting up this new Receiver Driver: Once you have added this new receiver to be displayed on the Ports tab, be sure to defined the Start and End position numbers. |
| ▪ | Driver ID - The number of the selected Receiver will be inserted in the Receiver ID column. |
| ▪ | Receiver - The name of the selected Receiver will be inserted in the Receiver column. |
| ▪ | Start - Enter the Starting Position Number of this Receiver's Data Packet. |
| ▪ | End - Enter the Ending Position Number of this Receiver's Data Packet. |
| • | Click Save ("ü") to record your New Receiver Driver entry. |


![]()